


Deve's Technical Network
1947-1955 1st Chevy Trucks
216/235/261 Engine Solutions & More
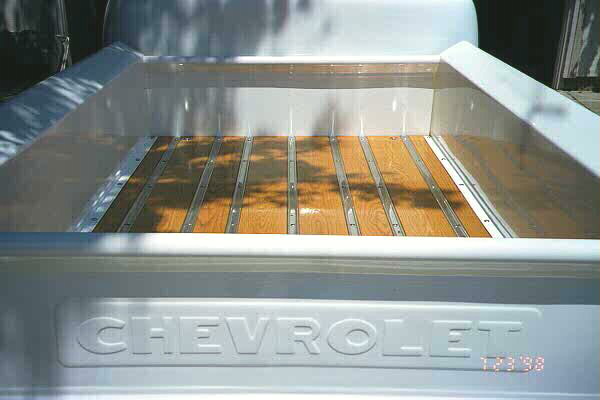
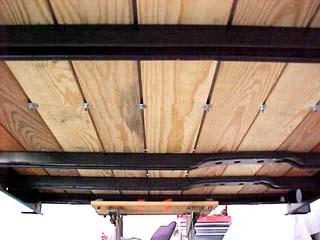
The bedwood in the Advance Design trucks was originally southern yellow pine. The wood came from the factory treated with a combination of linseed oil and lampblack, giving it a dull, black color. The boards were held down with metal strips between the boards which were painted black also. Remember that these were working trucks, meant to haul hay, manure, gravel, etc.
Many of the vendors listed at the Chevytrucks.org homepage (Vendors) sell bed replacement kits. You can buy the entire kits or any of the individual components. These kits can include the boards (usually available in either pine or oak), the metal strips (available in stainless steel or plain steel for painting), and all of the necessary hold down hardware. Most of the vendors also carry a booklet for around $4 or $5 titled " Bed Assembly and Restoration Manual ." Although the booklet does not include the dimensions (given below) it has lots of useful information about restoring and reassembling your bed.
When replacing the bedwood, people usually take one of two approaches to finishing the wood. They either try to duplicate the original look, or they go with a clear finish to show the wood grain. If you want to have a bed that resembles the original, here are two methods suggested by our members that you might try.
Get a pint of Pine Tar, usually from farm supply outfits, mix it with enough 'turps' Turpentine, to thin it out, and then add it to at least a gallon of Boiled Linseed Oil. Do this when all of it is warm, as in sitting out in the sun for a few hours. Mix and stir well and coat the 'be jabbers' out of the boards. For a different fragrance, toss in a bit of diesel or 'kero' Kerosene. Do not let it dry out. Keep flooding the wood with the mixture and at night cover well. The Boiled Oil will start to skin over if left exposed to air so I made a 'tub of old boards lined with plastic to hold the mess. After about a week, take the boards out drain the excess back into the tub and when all are done save the 'goo' for other like minded jobs. Hint, after saving the 'goo' float a layer of kero or diesel on top to prevent the linseed from drying out.
I finished the wood by rubbing on an oil-based paint (black to go with the bed strips painted black w/ clear coat), and wiping it off within 1 minute. For final finish, if possible, I think a clear coat would be sweet, but with budget in mind, I used a UV resistant outdoor, spar varnish, lightly sanded between coats. It sure looks good. The wood grain is dark, yet very visible.
Many oletruckers, when they replace the bedwood, choose to use a variety of clear finishes to bring out the beauty of the wood grain. When purchasing a clear finish for this purpose, be sure to get a finish that is UV resistant to reduce the potential damage from the sun. Most marine type varnishes will meet this criteria.
If you prefer to use your own boards, you need numbers and dimensions. From 1947 to early 1951, there were 9 boards making up the bed. From late 1951 to 1955 1st, there were 8 boards. The boards were nominally 1" thick (making them a measured 3/4" thick). The width of the boards varied depending on position. The tables below show the width of each board and its relative position.
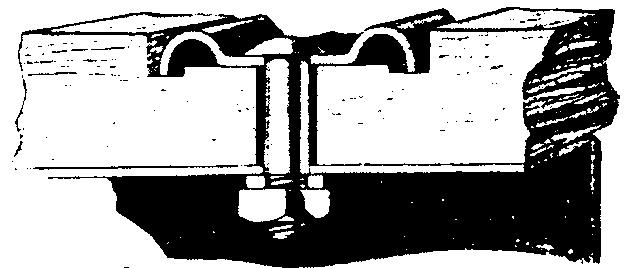
The individual boards were held down by steel strips (called "wear strips") which sat in grooves in each board. You will note from the drawing below that the outer edges of the wear strip came down lower than the middle of the wear strip. This explains the somewhat unusual groove pattern of the wood (see below for dimensions.)

The two outside boards had grooves only on their inside edges. All of the other boards had grooves down both sides. The drawing below shows how the boards were grooved. The dimensions given are from members measuring old bedwood. If I was going to create my own board, I would purchase the wear strips first and use those measurements to adjust the dimensions below. The shallower the inside groove is, the higher the wear strips will ride above the bedwood. Originally, the top protrusions of the wear strips were just slightly higher than the bedwood.
Why would GM go through so much trouble designing the bedwood? Eric Phillips sent me the following information that explains this...
The reason for the unusual design is wood movement due to moisture content change. A six inch wide board can easily change width cross grain by 1/16" - 1/8" due to seasonal humidity changes. The groove design allows the boards to float without buckling while still being firmly held to the steel supports underneath.
My GMC fleet side box has 12 boards across ranging from 5" to 7" in width, so the bed may change width by over an inch between dry winter storage and humid summer time conditions. For people who are making bedwood as I did, please note: different species of wood move different amounts in response to humidity (moisture content) changes. It is important to allow clearance between the hold down bolts and the wood so that movement can occur. If you're working dry wood in a heated shop (shrunk condition) more expansion room should be allowed than if you're working air dried wood in the humid part of summer with no heat in the shop (expanded condition). Varnish or polyurethane does not prevent this natural wood movement but may slow it down some, so if you don't varnish or seal both the upper and lower surfaces of the boards, they will change moisture content faster on the unsealed surface causing cupping of the wood. Interestingly, the wood changes little along the grain (lengthwise) so it is not necessary to allow for much change in length.
Bedwood is a project that anyone with a decent table saw can do, and it allows an infinite number of choices for wood material. I chose quarter sewn white oak because it is hard, naturally rot resistant, cup resistant (due to quarter sewn orientation) and it's quite attractive. The draw backs are it's heavy and expensive. My 12-board bed cost $425.00 for S2S planed, kiln dried stock.
Eric A. St. Phillips
1959 GMC 100, long fleet-side
I've restored a few Advance Design beds in the past so I know some of the surprises that await the first time restorer. I'll try to help alleviate some of those surprises by including as much information as possible on what I know about the different bed varieties, board widths, board thickness, components, parts suppliers and restoration methods.
|
|
|
|
|
|
|
|
|
|
|
|
|
|
|
|
|
|
|
|
|
|
|
|
|
|
|
|
|
|
|
|
|
|
|
|
|
|
|
|
|
|
|
|
|
|
|
|
|
|
|
|
|
|
|
|
|
|
|
|
|
|
|
|
|
|
|
|
|
|
|
|
|
|
|
|
|
|
|
|
|
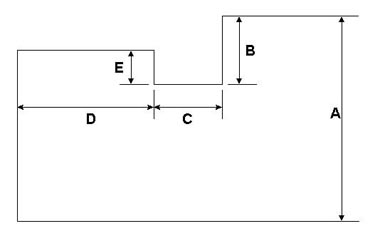
Chevrolet and GMC 1/2 ton beds starting in 1947-'53 had the following dimensions:
Chevrolet and GMC 3/4 ton beds starting in 1947-'53 had the following dimension:
In 1954 Chevrolet reduced the frame kick-up to allow for an increase in bed depth of 2". The bed dimensions changed to:
GMC Corporation had all the similar bed configuration as Chevrolet but due to it's stronger engines with full
flow oiling, it was able to offer the long 1/2 ton truck as an option to its buyers well before 1954. The long 1/2 ton
incorporated an extended frame to support the lengthened box on the 1/2 ton chassis. This lengthened box was only available
on the Chevrolet 3/4 ton chassis.
The long 1/2 ton can be distinguished from the 3/4 ton by the quantity of lug nut on the rear end. If the rear end has 6
lugs then its a long 1/2 ton but if it has 8 lugs then its a 3/4 ton.
If you would rather cut your own boards for your bed then ordering up a kit your going to need to know how many boards you'll need and their dimensions. From the chart above you can see that the 1947 to early 1951 trucks had 9 boards making up the bed. The late 1951 to 1954 used 8 boards.
The boards width depended on what position they were placed on the bed end cross sills. You can kind of get an idea of the bed wood width and for that matter a clue to the beds year "if the bed happened to have been changed at one time" by counting the wear strips in the bed or if their missing the holes for the wear strips in the front or rear cross sills. If their are 8 holes in the sill then the bed is from a 1947- Early 1951 series. If their are only 7 holes in the sill then the bed is from the Late 1951-54 series.
|
1947 to Early 1951 9 Boards |
||||||||
| 4 1/4" | 5" | 5 1/2" | 5 1/2" | 6 3/8" | 5 1/2" | 5 1/2" | 5" | 4 1/4" |
|
Late 1951 to 1954 with 8 Boards |
|||||||
| 4 1/4" | 7 1/4" | 5" | 7 1/4" | 7 1/4" | 5" | 7 1/4" | 4 1/4" |
The original boards final thickness is 3/4". This can be confirmed by measuring the step in the back #4 cross sill by the tailgate. This step allows the wood to fit even with the rear cross sill for ease of cleaning out the bed or shoveling out gravel without hitting a ledge when the tailgate is down.
The bed wood has a few special milling steps added to it for extended life and service.
The edges of each board "except the outer most edges of the two outer bed boards" are milled with a special groove which allowed the:
Probably one of the most misunderstood and often just plain missing parts on the bed assembly are the cross sills. It's no wonder because by the time you purchase the truck usually the original wood has long since disappeared and often times with one or two of the cross sills.
|
|
|
|
|
|
|
|
|
|
|
|
|
|
|
|
|
|
|
|
|
|
|
|
|
|
|
|
|
|
|
|
|
|
|
|
|
|
|
|
The cross sills above the gas tank were manufactured with a recess to allow the gas tank to sit higher up next to the bed
for ground clearance.
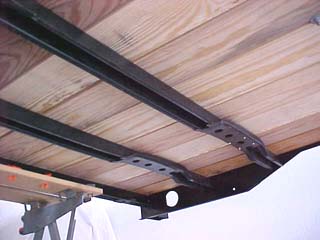
The installation of the bed to the truck frame requires the installation of wooden block spaces under certain cross sill braces to level the bed on the Advance Design frame. The spacers are required to raise the bed floor higher to clear the frame kick up at the axle centerline for rear end axle travel. The cross sills must therefore be placed in the correct position in relation to the frame for correct bed support.
Probably the easiest of all the cross sills to install because it's bolted to the front bed panel. This cross sill is also drilled for the front bed to frame mounting bolts to pass through. This cross sill requires a 2" wood spacer and a 12 inch long 3/8 carriage bolt to pass all the way through the frame and tighten to the lower edge of the frame. The 1947-53 requires the 12" bolt while the 1954-55 1st Series only requires the 6" bolt.
This cross sill only bolts to the lower side of the wood and not the frame. The cross sill adds support to the wood to avoid cupping. It's bolted just in front of the frame kick up and when installed will be just above the frame by 1/2" or so and only contacts the frame when a heavy load is encountered.
This cross sill installs like #1 described above with a 2" wooden block and secured with a carriage bolt which ends just below the top frame edge. This sill is located just behind the frame kick up and it's placement can be easily determined by locating the frame hole behind the kick up which is where the carriage hold down bolt will pass through.
This cross sill is basically the back section of the bed that holds the sides together. The rear sill has a metal pad welded to the cross sill so no wooden block is required to level the bed, only a rubber vibration pad to eliminate squeaks.
Practically all the major parts suppliers will carry bed wood kits to complete your project. Review the parts supplier page to find a vendor in your area.