


Deve's Technical Network
1947-1955 1st Chevy Trucks
216/235/261 Engine Solutions & More
Some of you have heard from other conversations people talking about 6-volt and 12-volt flywheels. This is what they are talking about: The 12 volt system was first introduced in 1955 so anything older will be a 6 volt vehicle. The 6 volt system was dumped because 6 volts takes twice the current (amperage) as a 12 volt system. You will notice on your 6 volt vehicles the beefier wiring that was required. When GM went from 6 to 12 volts, they also reconfigured the starters. The starter drives are not interchangeable. The new design for 1955 was not only a 12 volt starter, but more teeth on the ring gear (flywheel). Since the starters have the number of teeth to compensate for the increase in flywheel teeth, they are not compatible. Both have 9 teeth on the starter drive gear, but the pitch is different. This makes it very hard to tell by looking at just the starter.
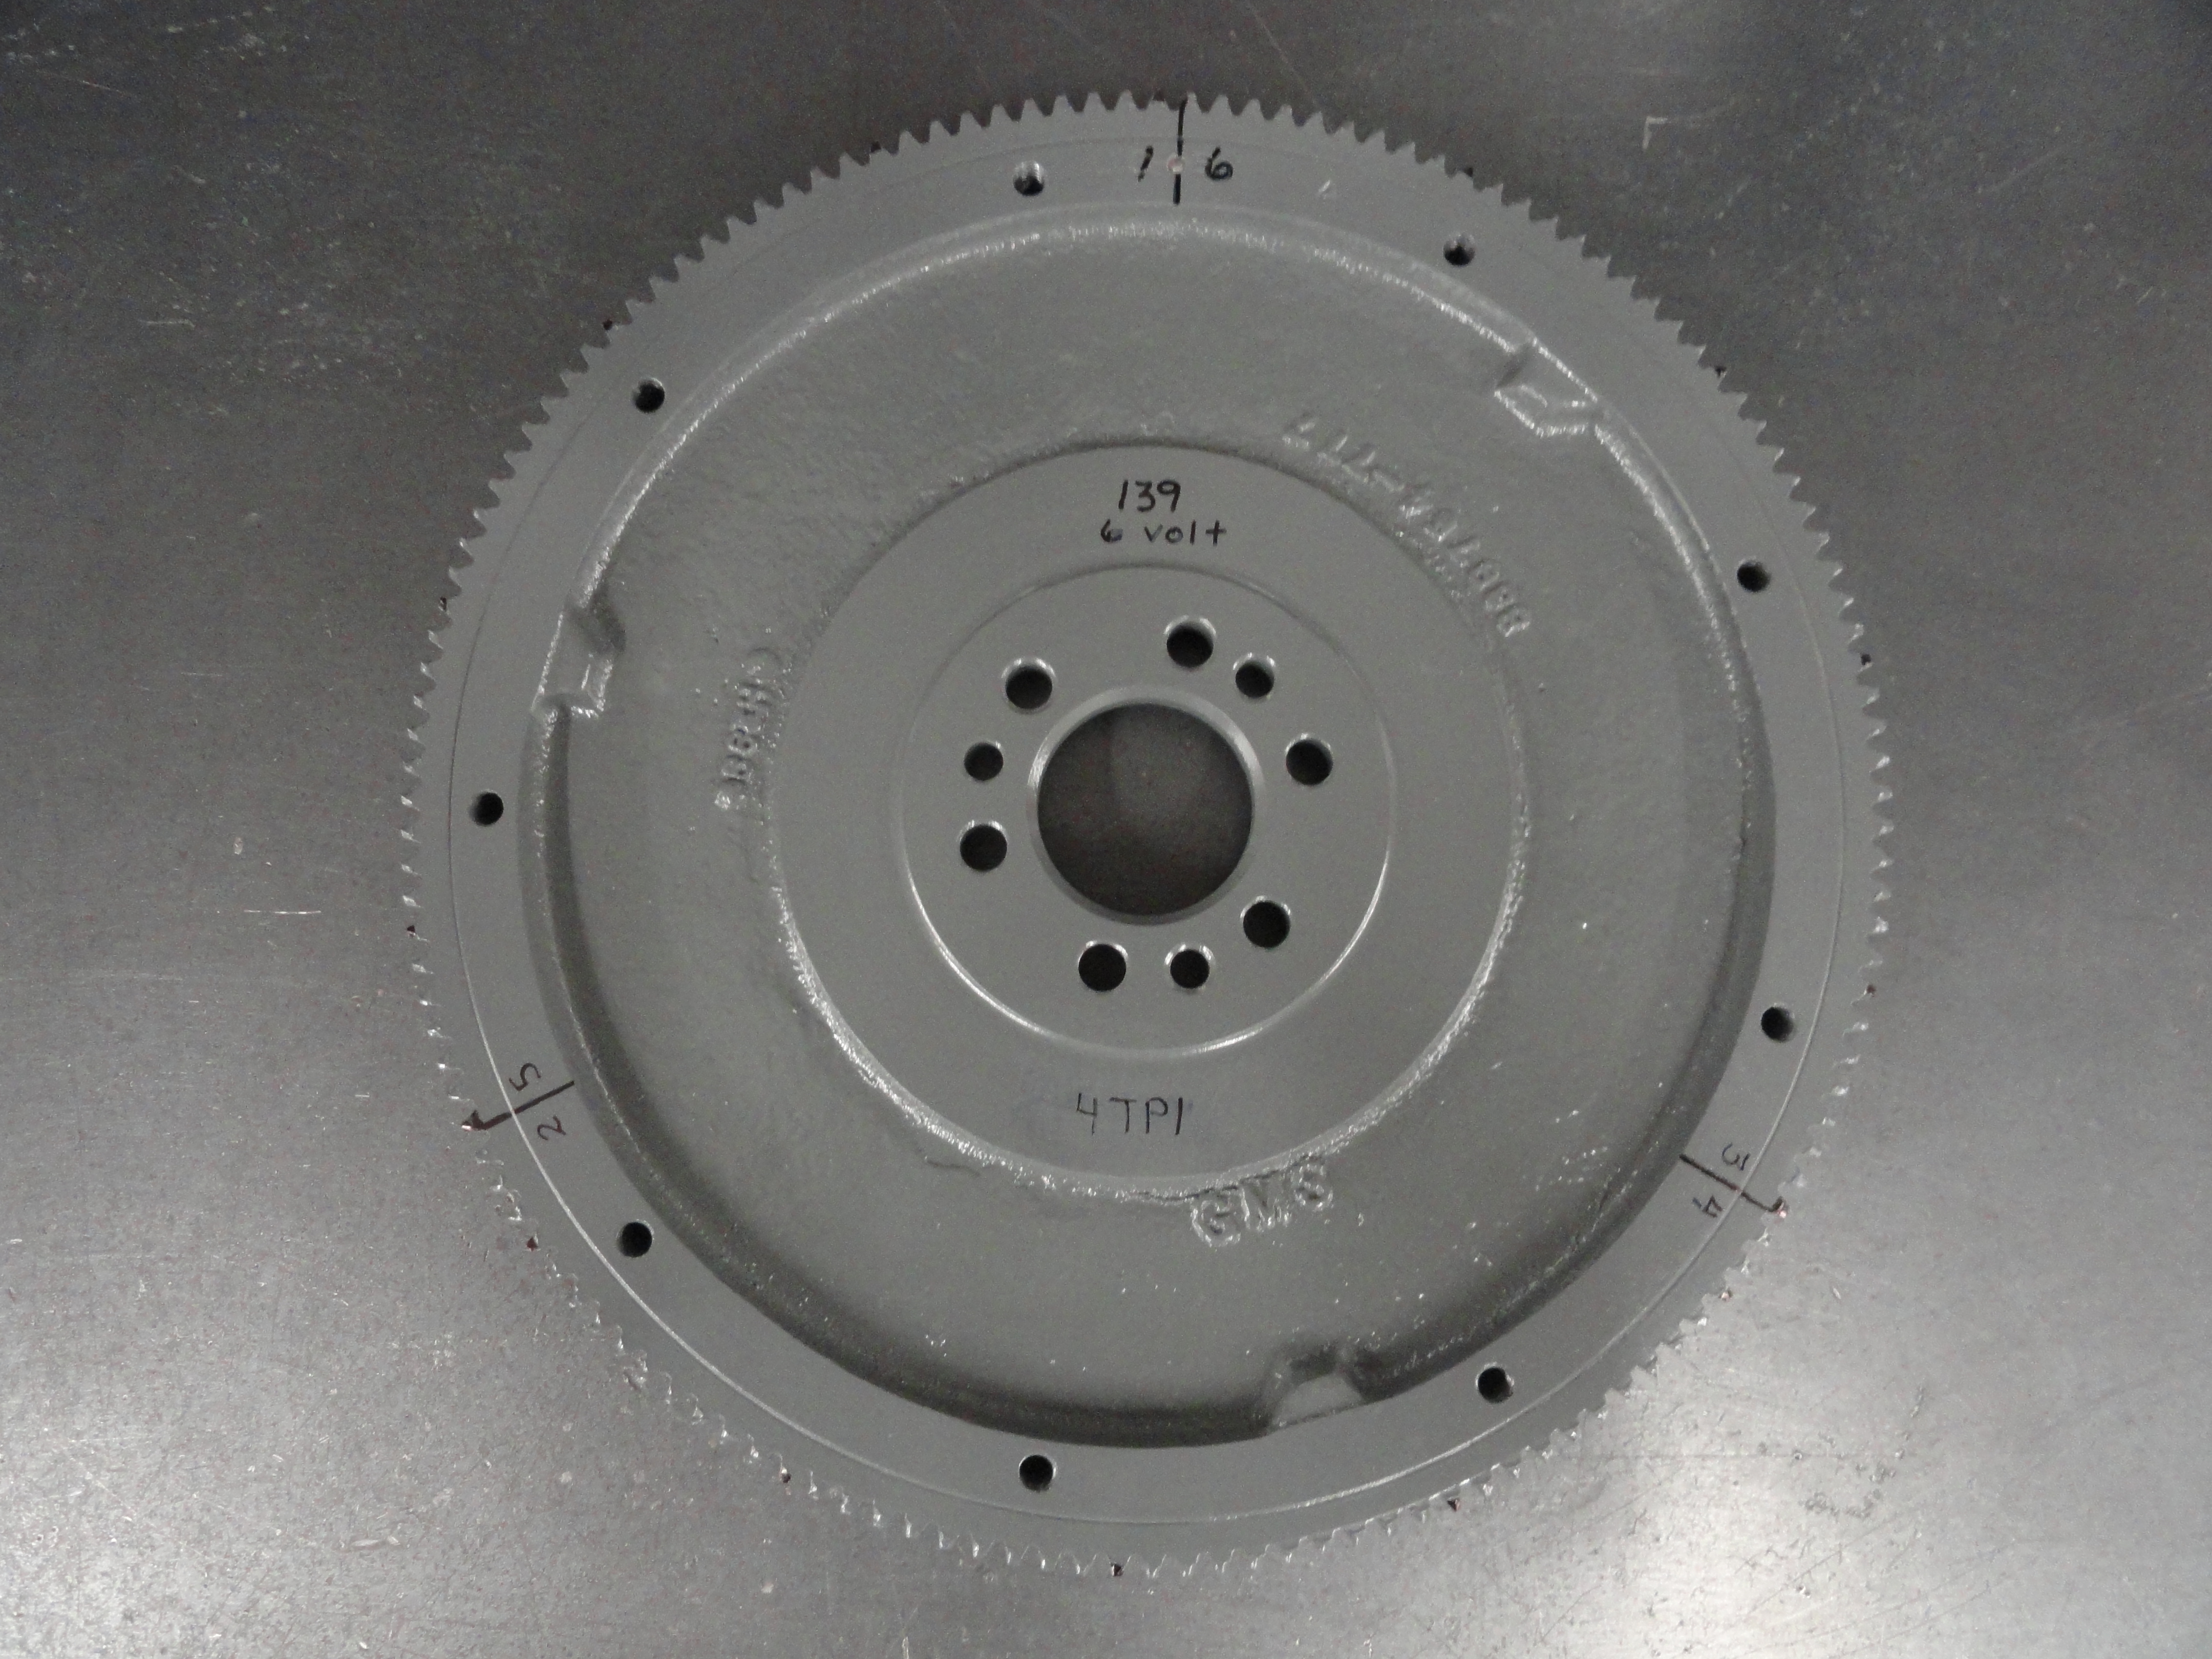
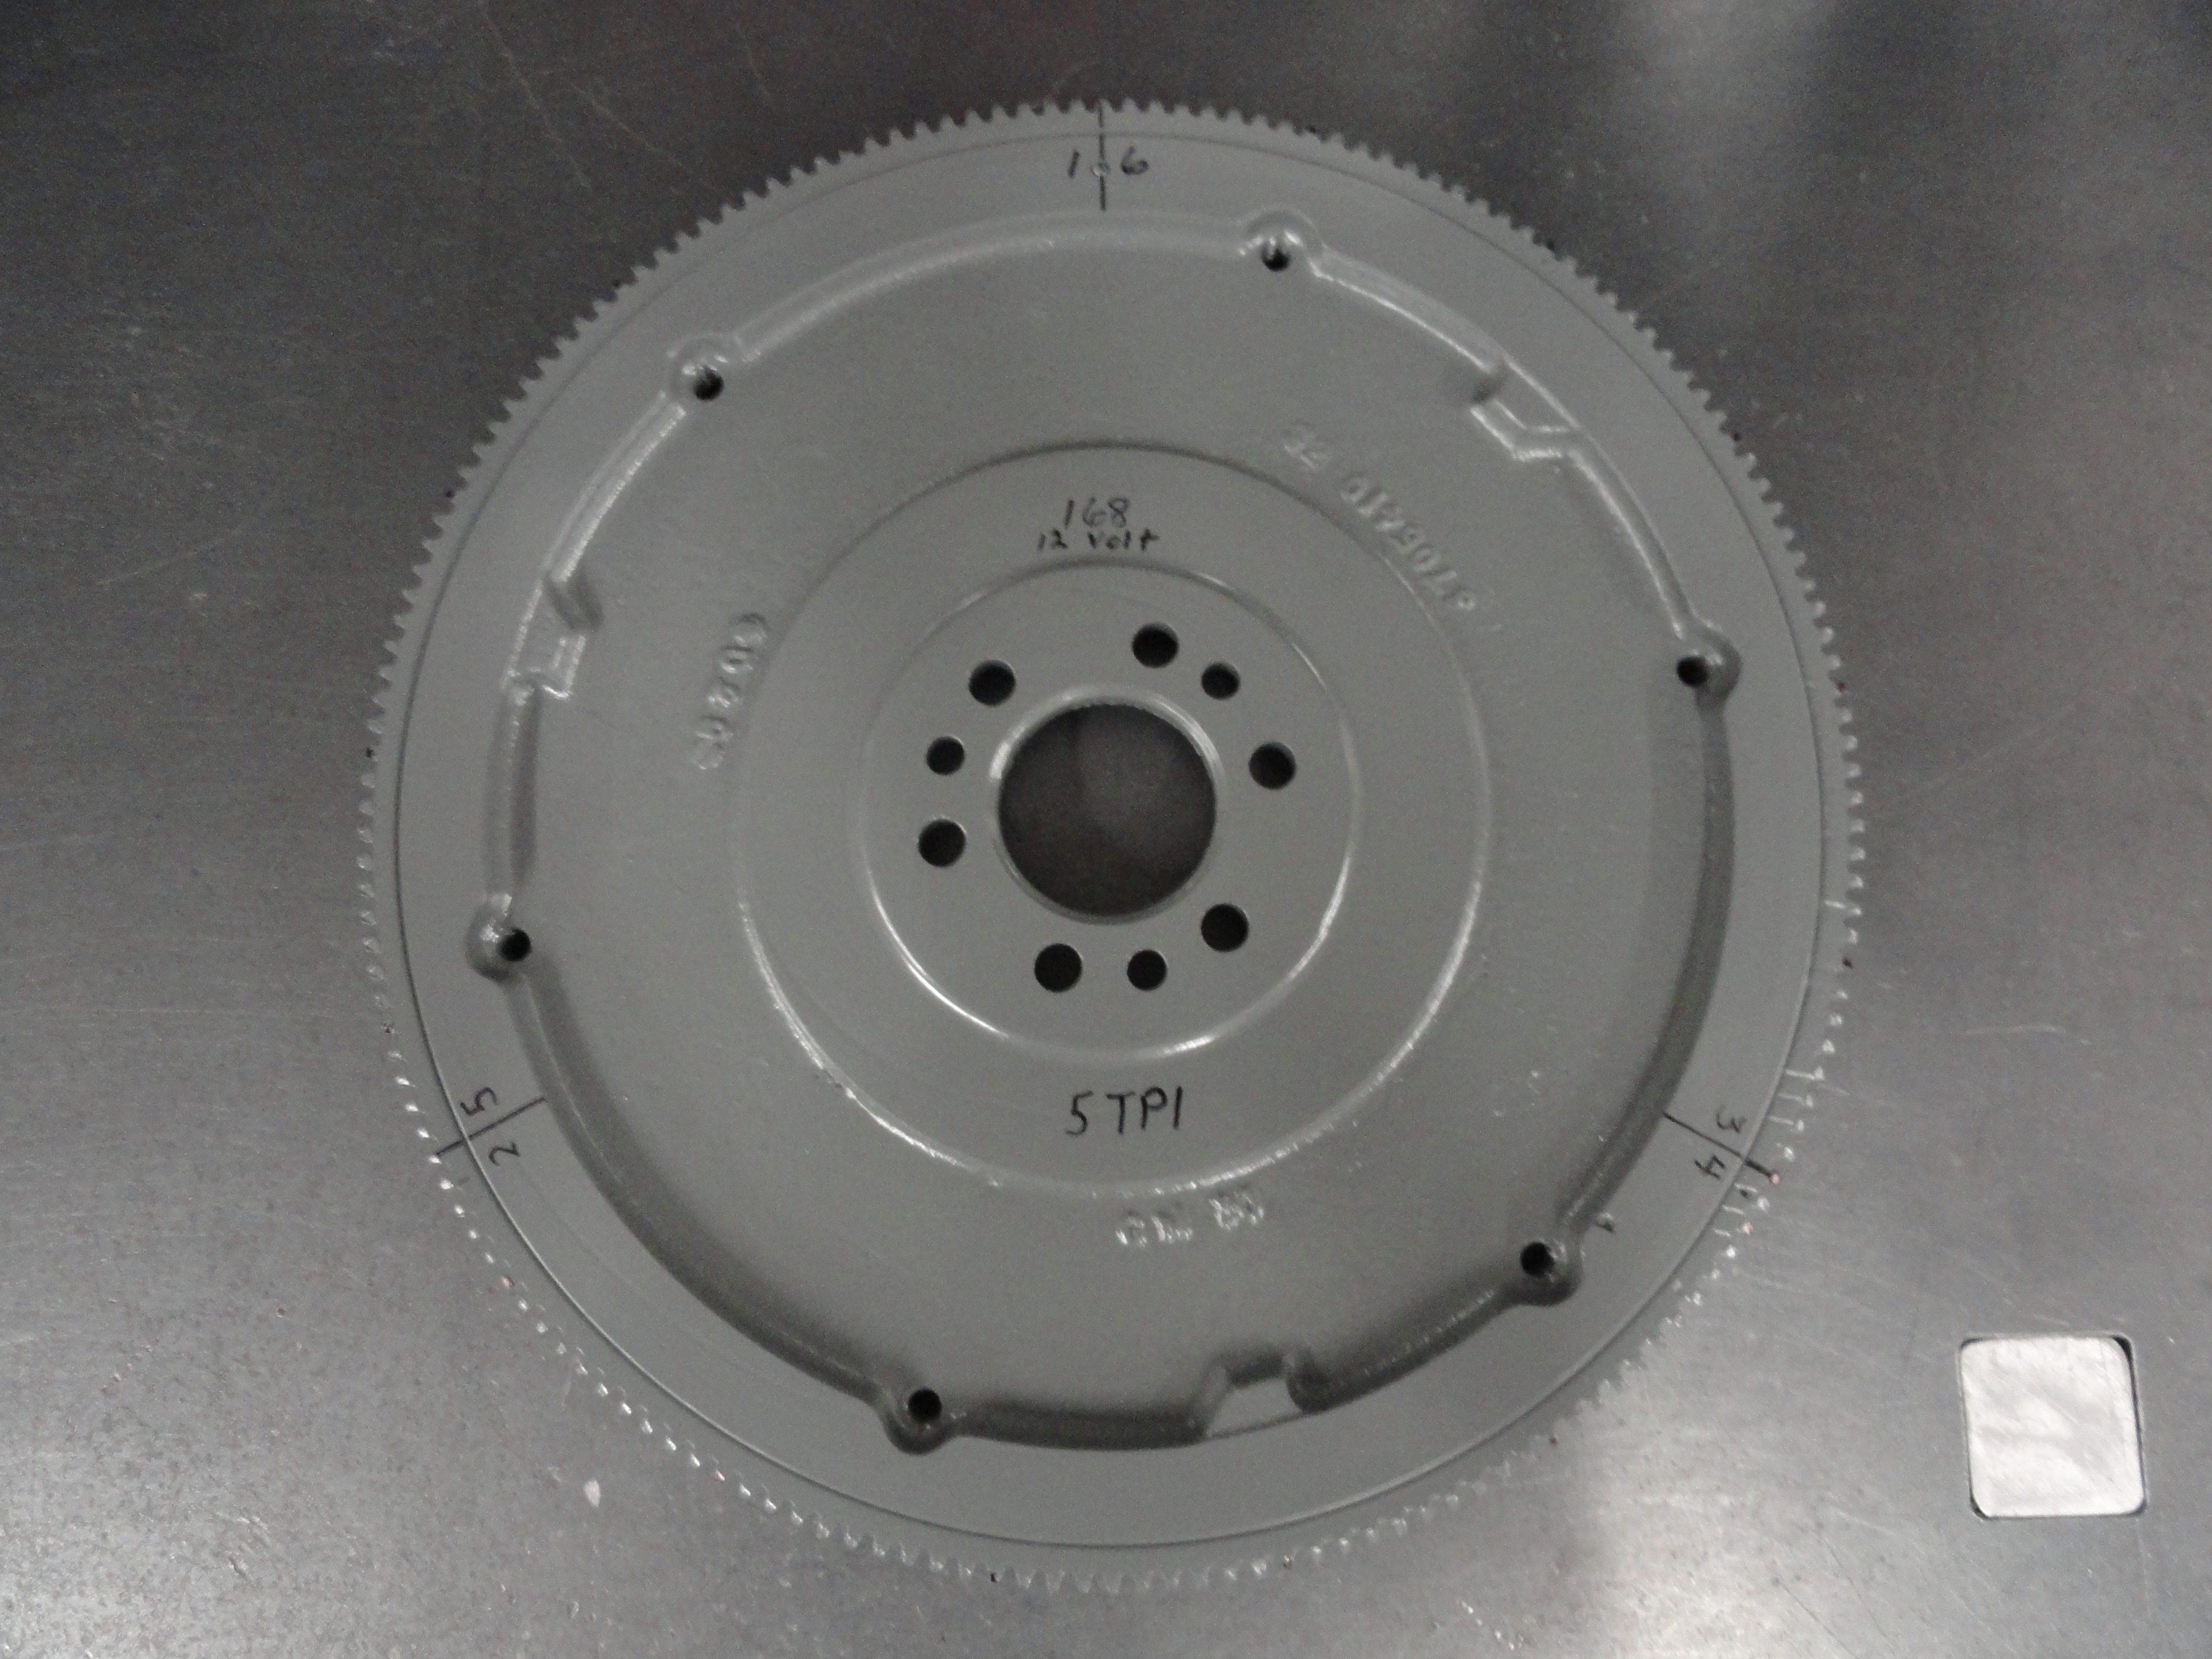
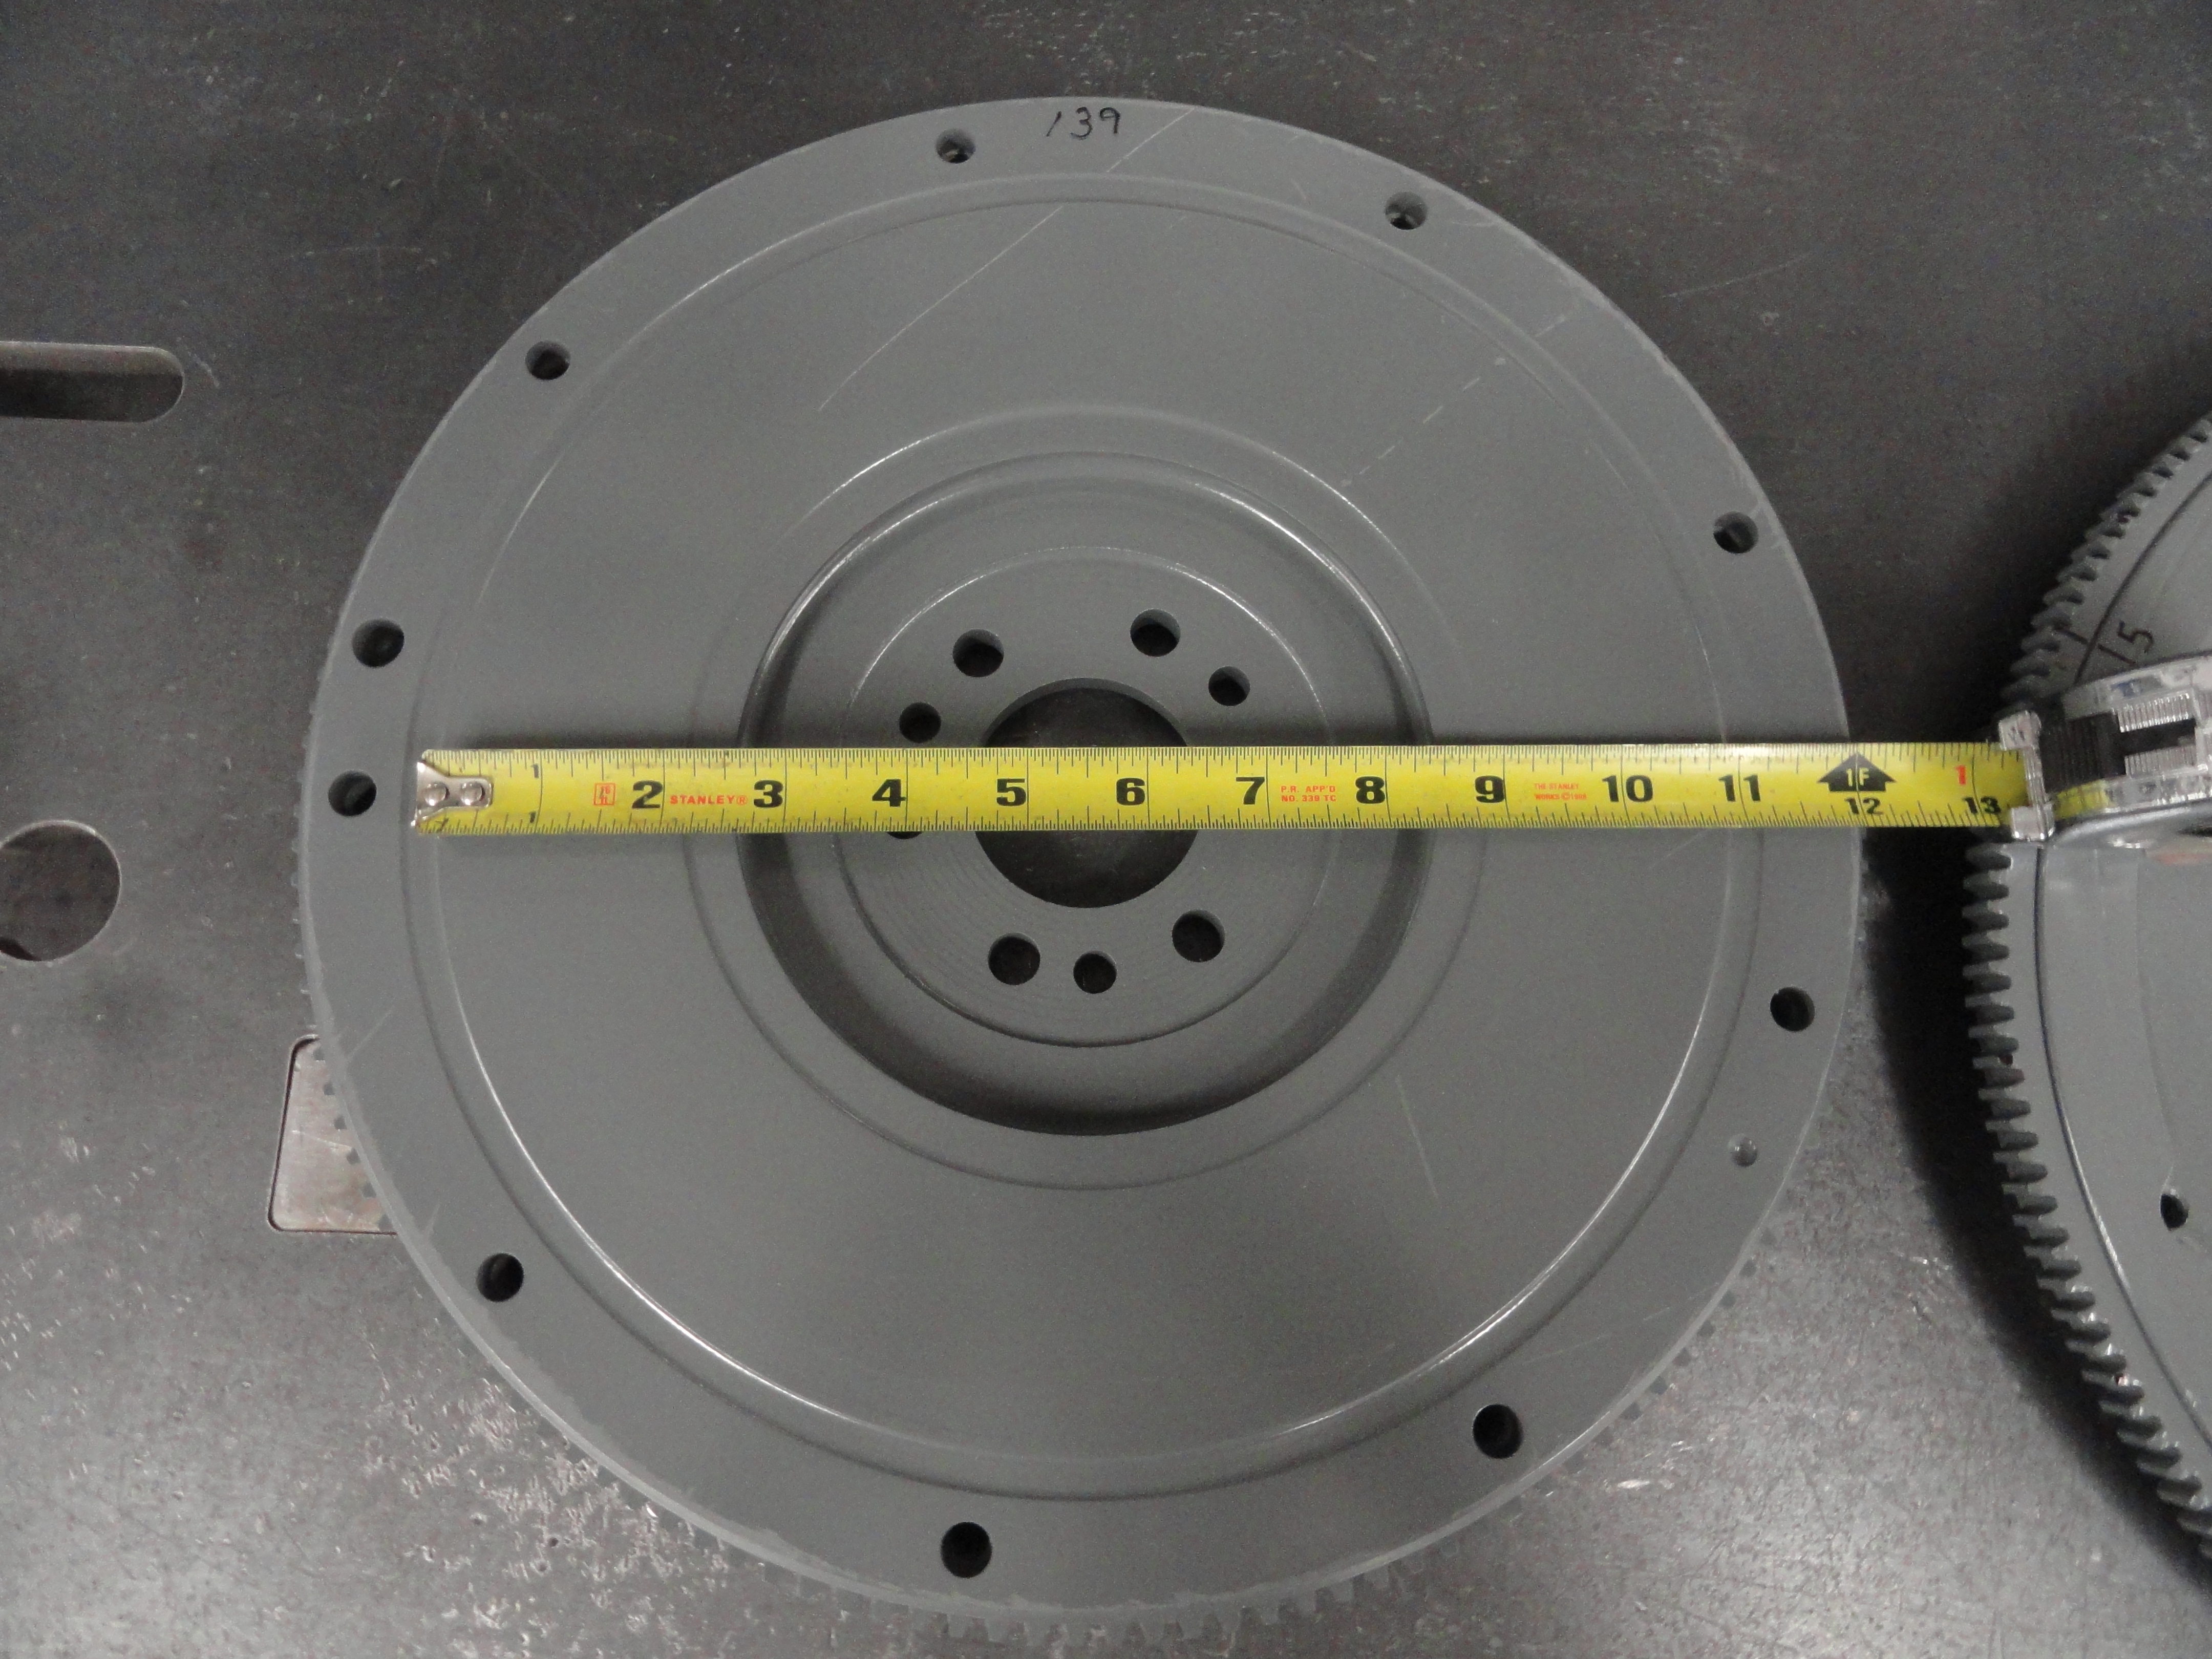
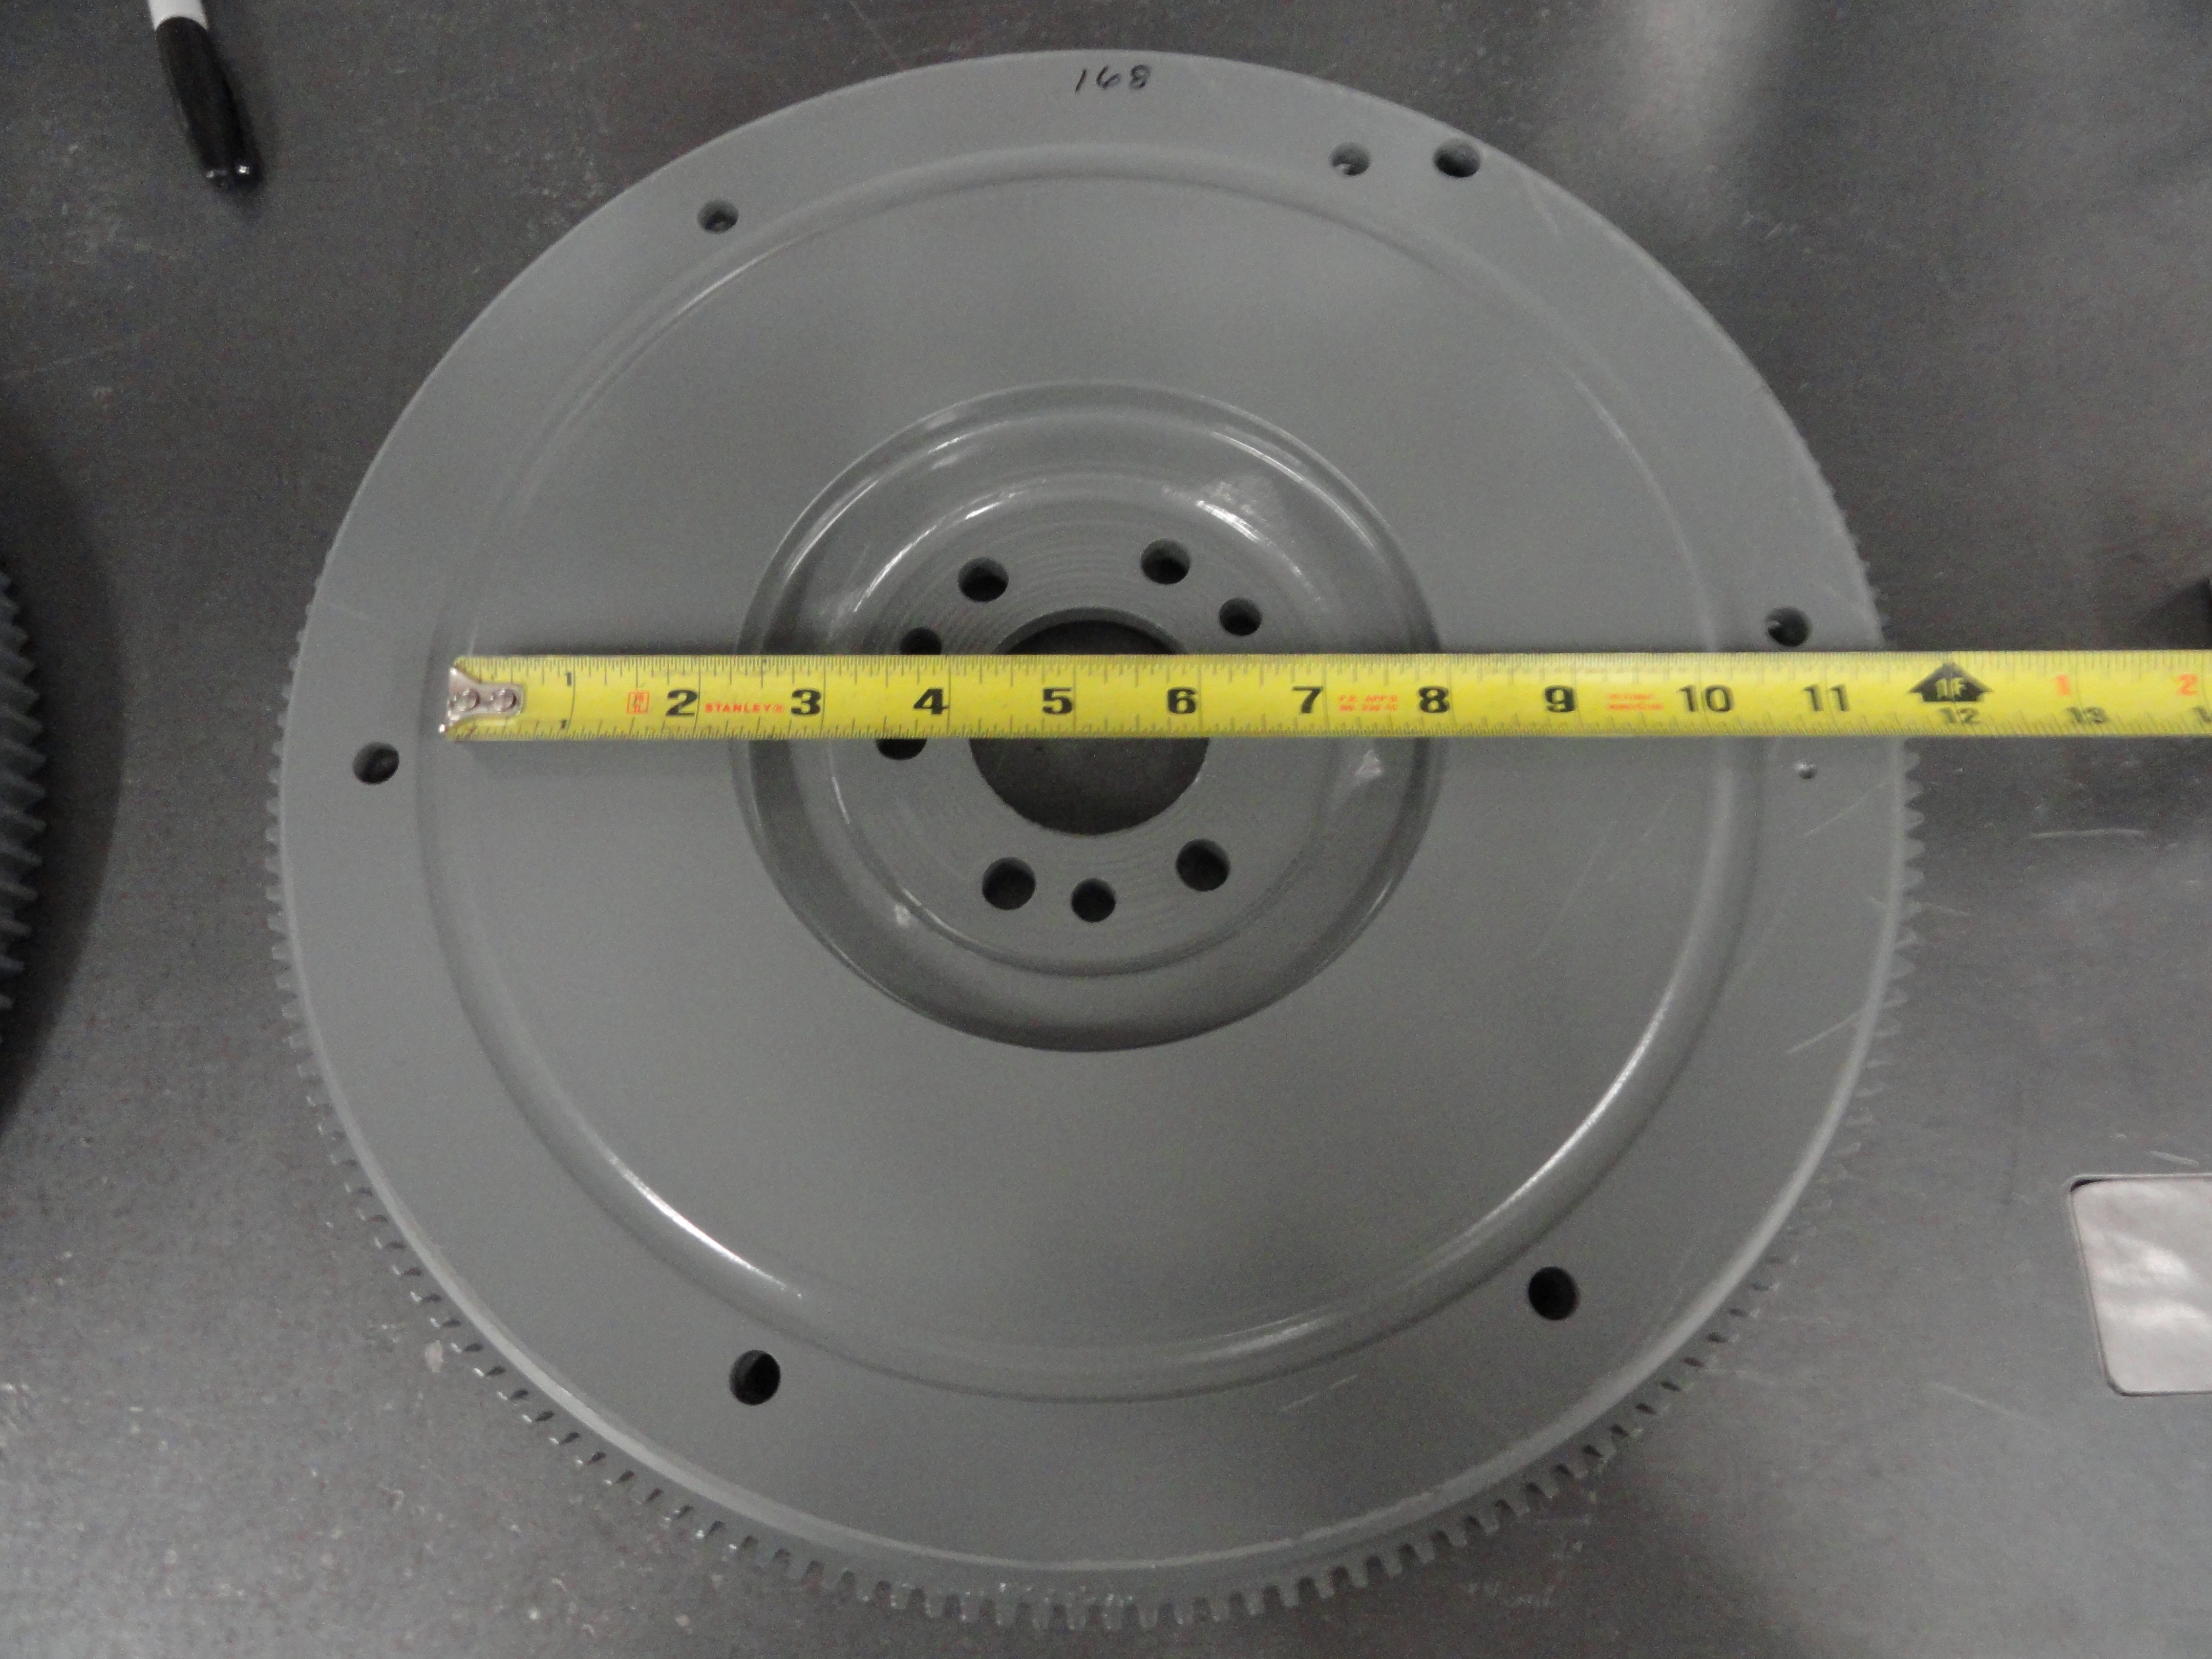
Vehicles older than 1955 that have 6-volt systems require a 139-tooth ring gear of 4 teeth per inch, while the 12-volt systems that are generally associated with the newer-style 235 or 261 engine have 168 teeth, or 5 teeth per inch. When installing a new-style 235 or 261 engine in your ride, and you desire to keep the 6-volt starter, you want to make sure you keep your 216 flywheel. If you try to mate a 6-volt starter with a 12-volt ring gear, the starter drive will grind and/or fail to engage. The old 6-volt starter with the floor "kick switch" will work perfectly fine on a 12-volt system so this enables you to keep your starter system original.
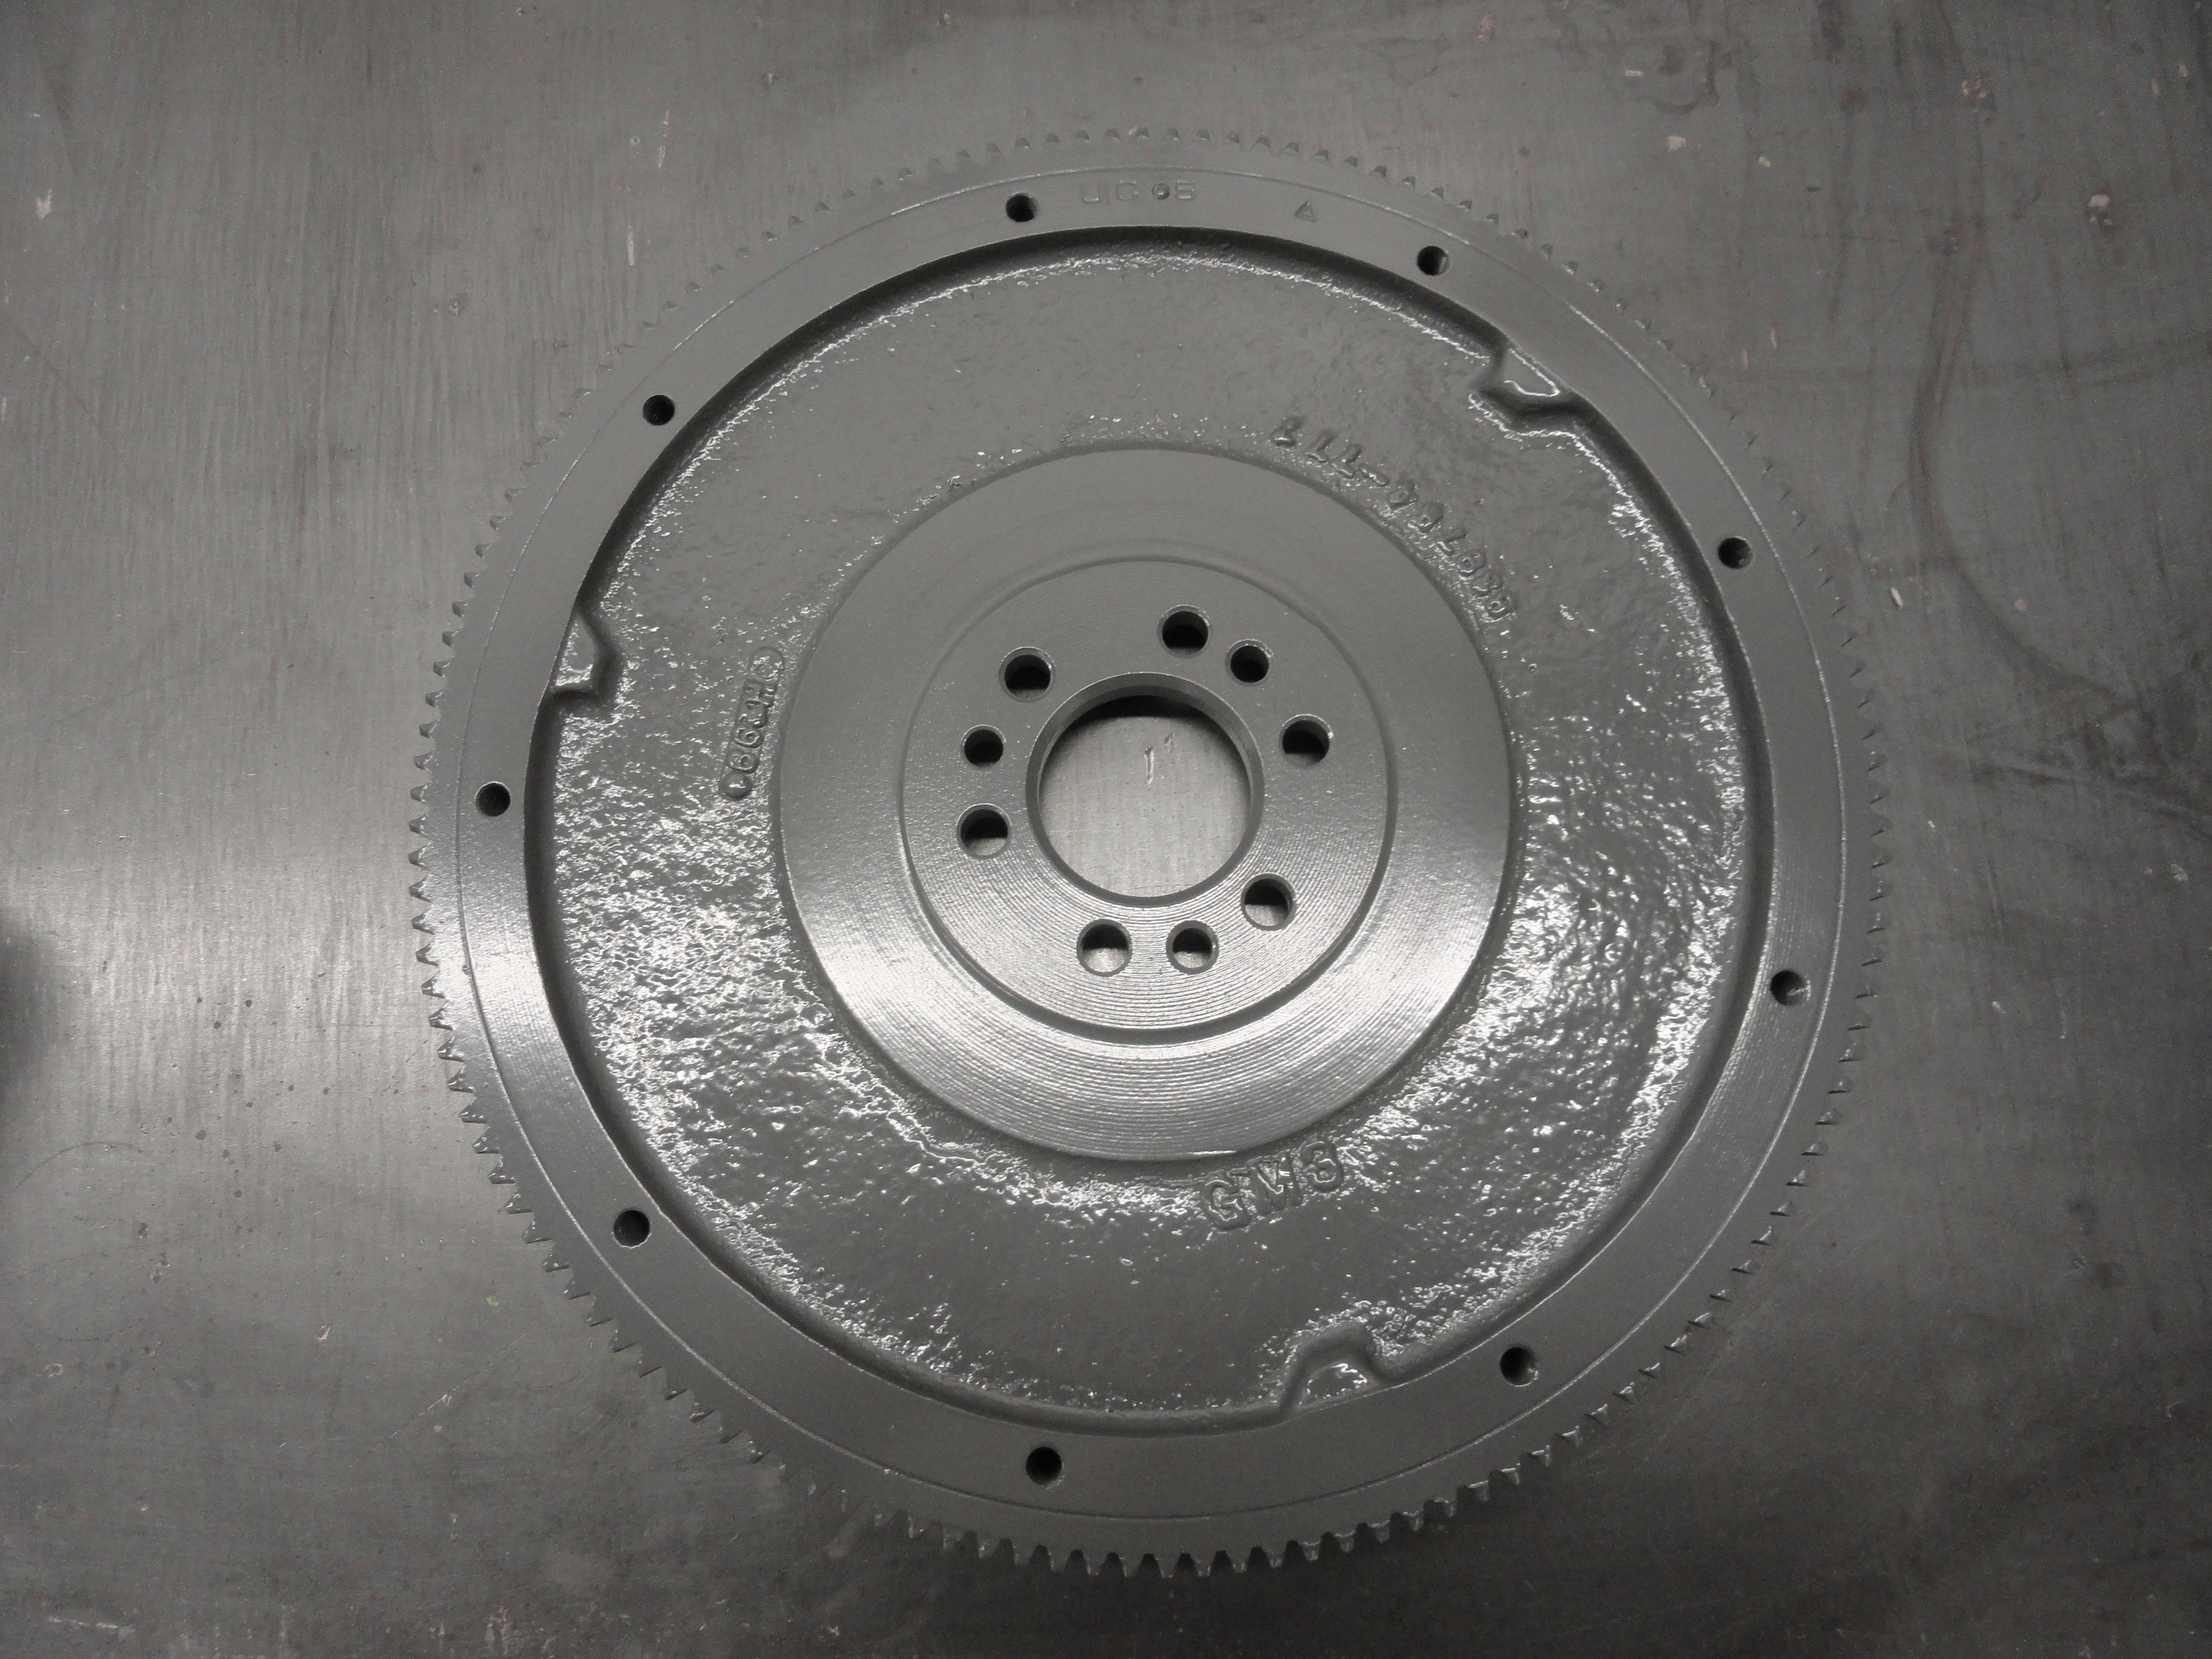
Restoring the flywheel is a worthwhile project. The BB is shined up really good using a Dremel then the flywheel is marked for clarifying the timing positions. This makes life so much easier when static timing the engine. Most owners do not realize there are two different flywheels that are possible on your 1954-1962 235/261 engine. This matters a great deal and you should be aware of which one you have.
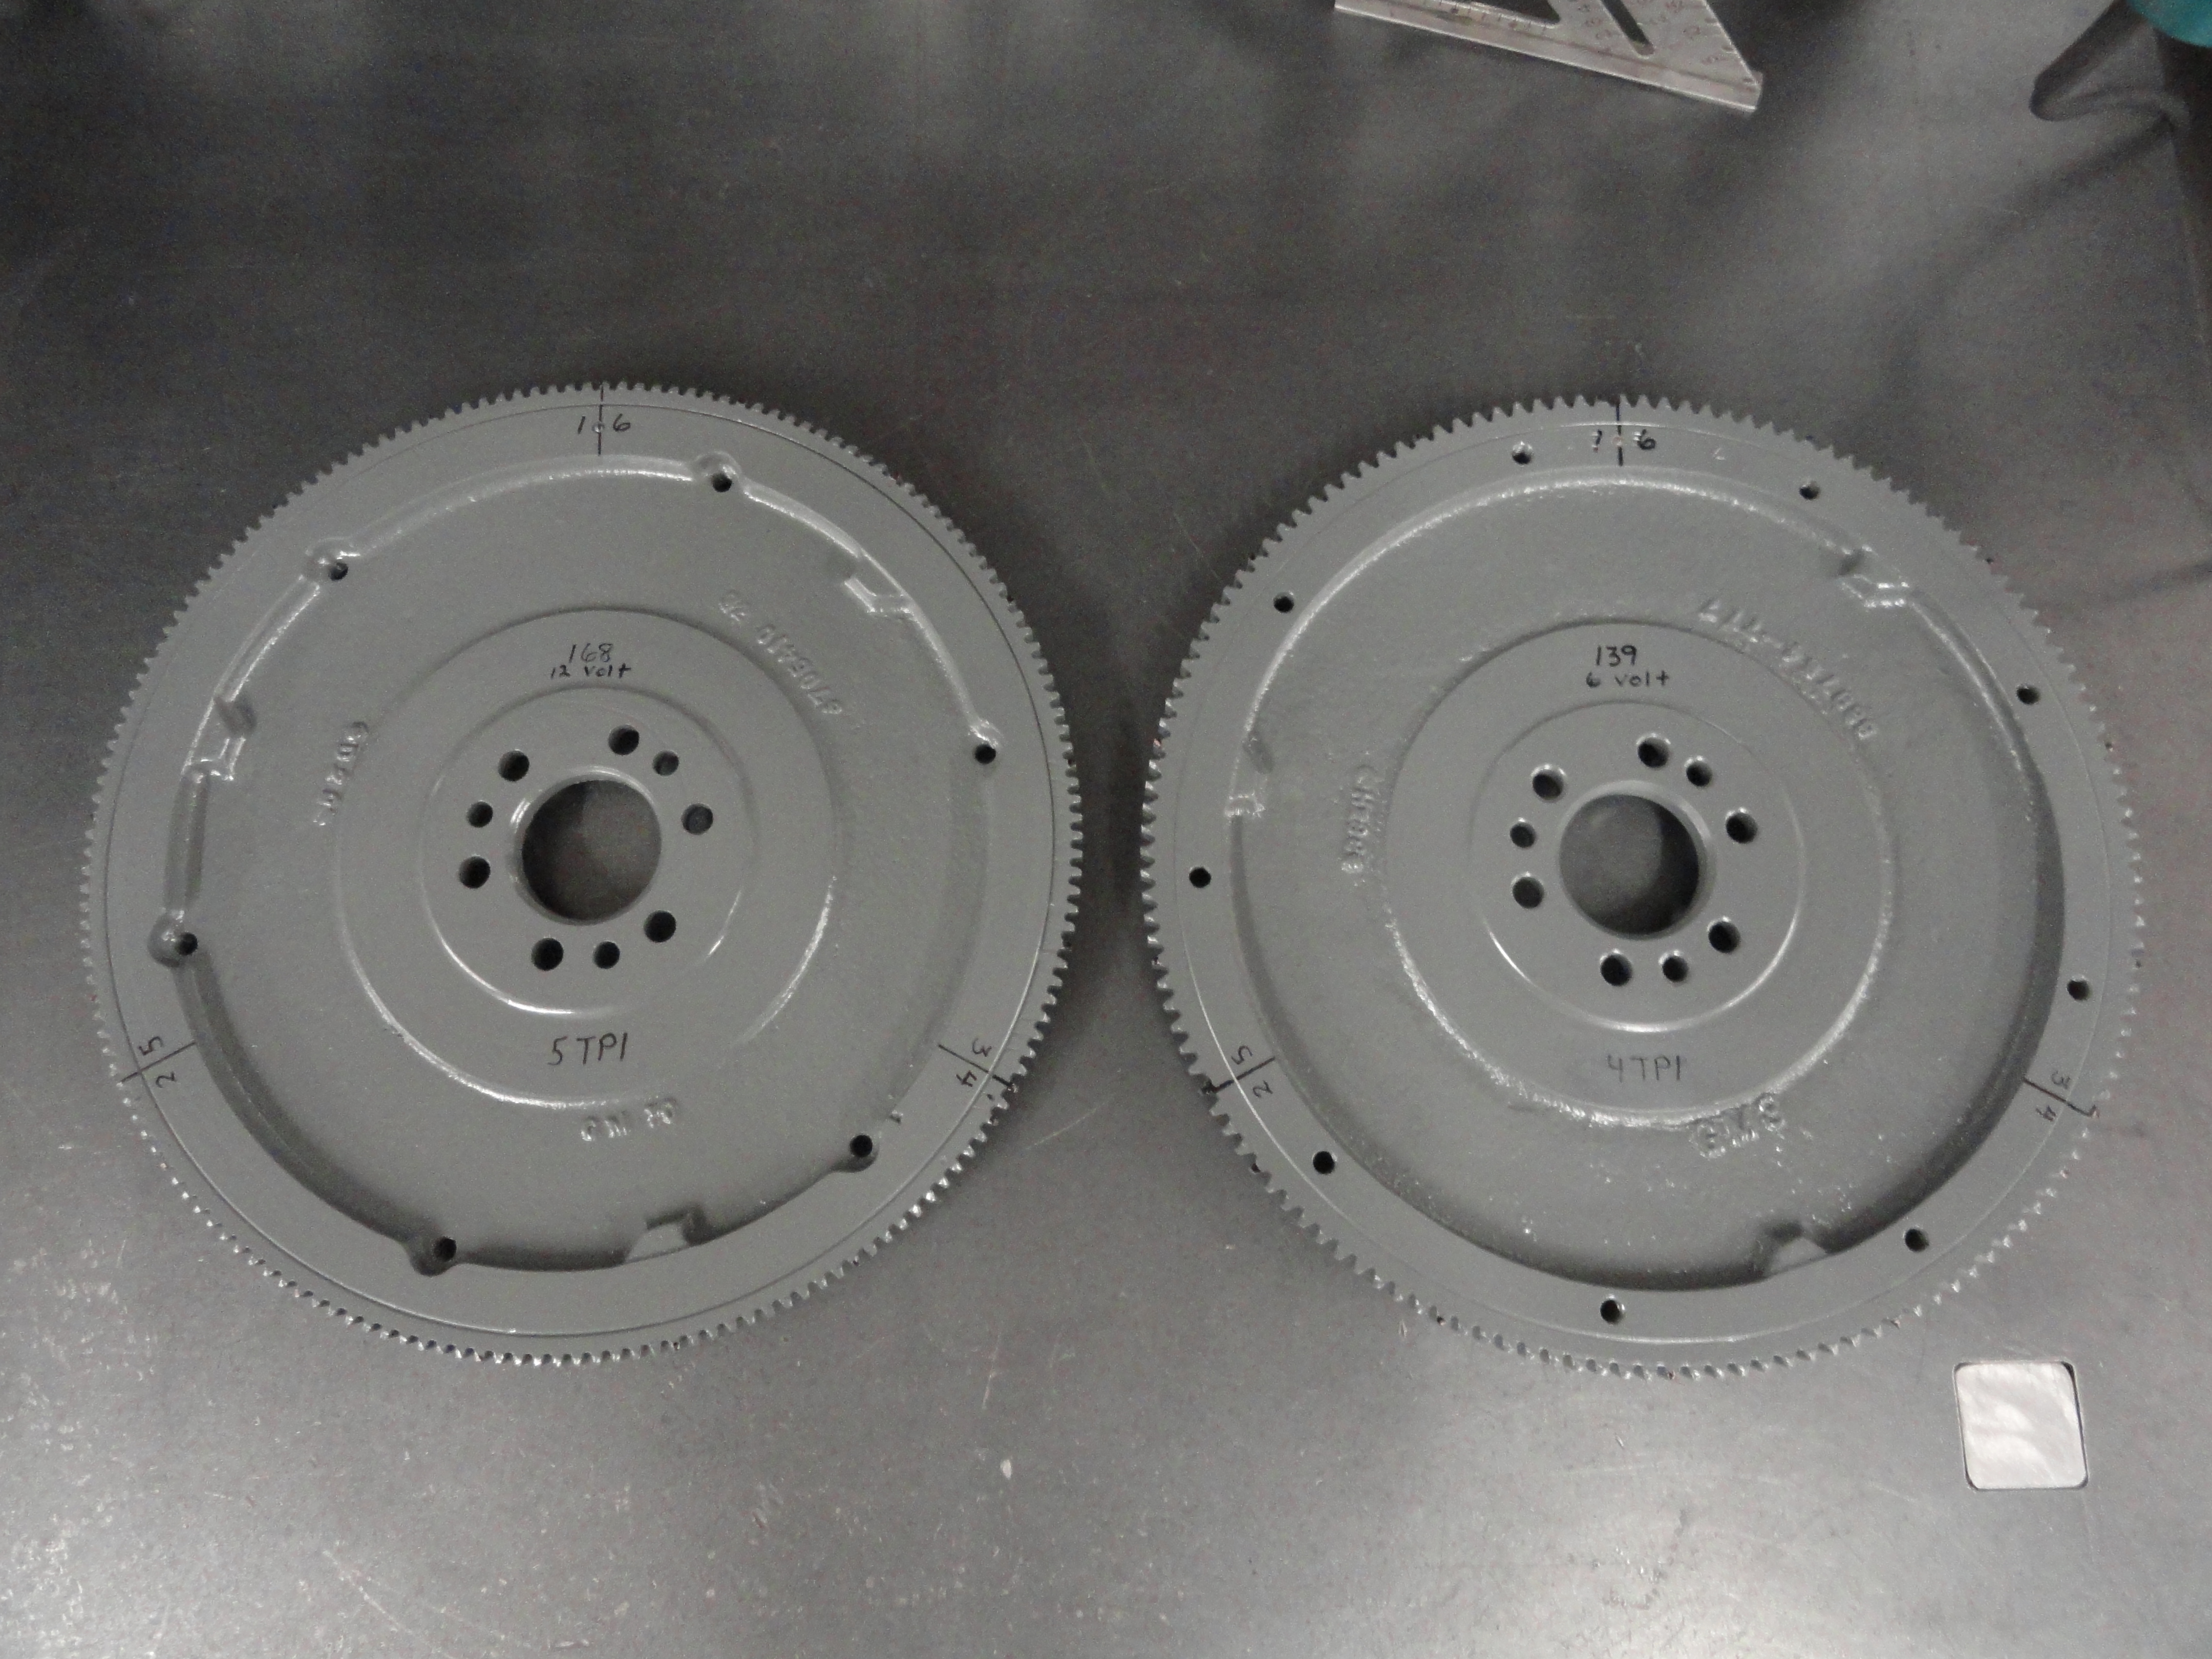
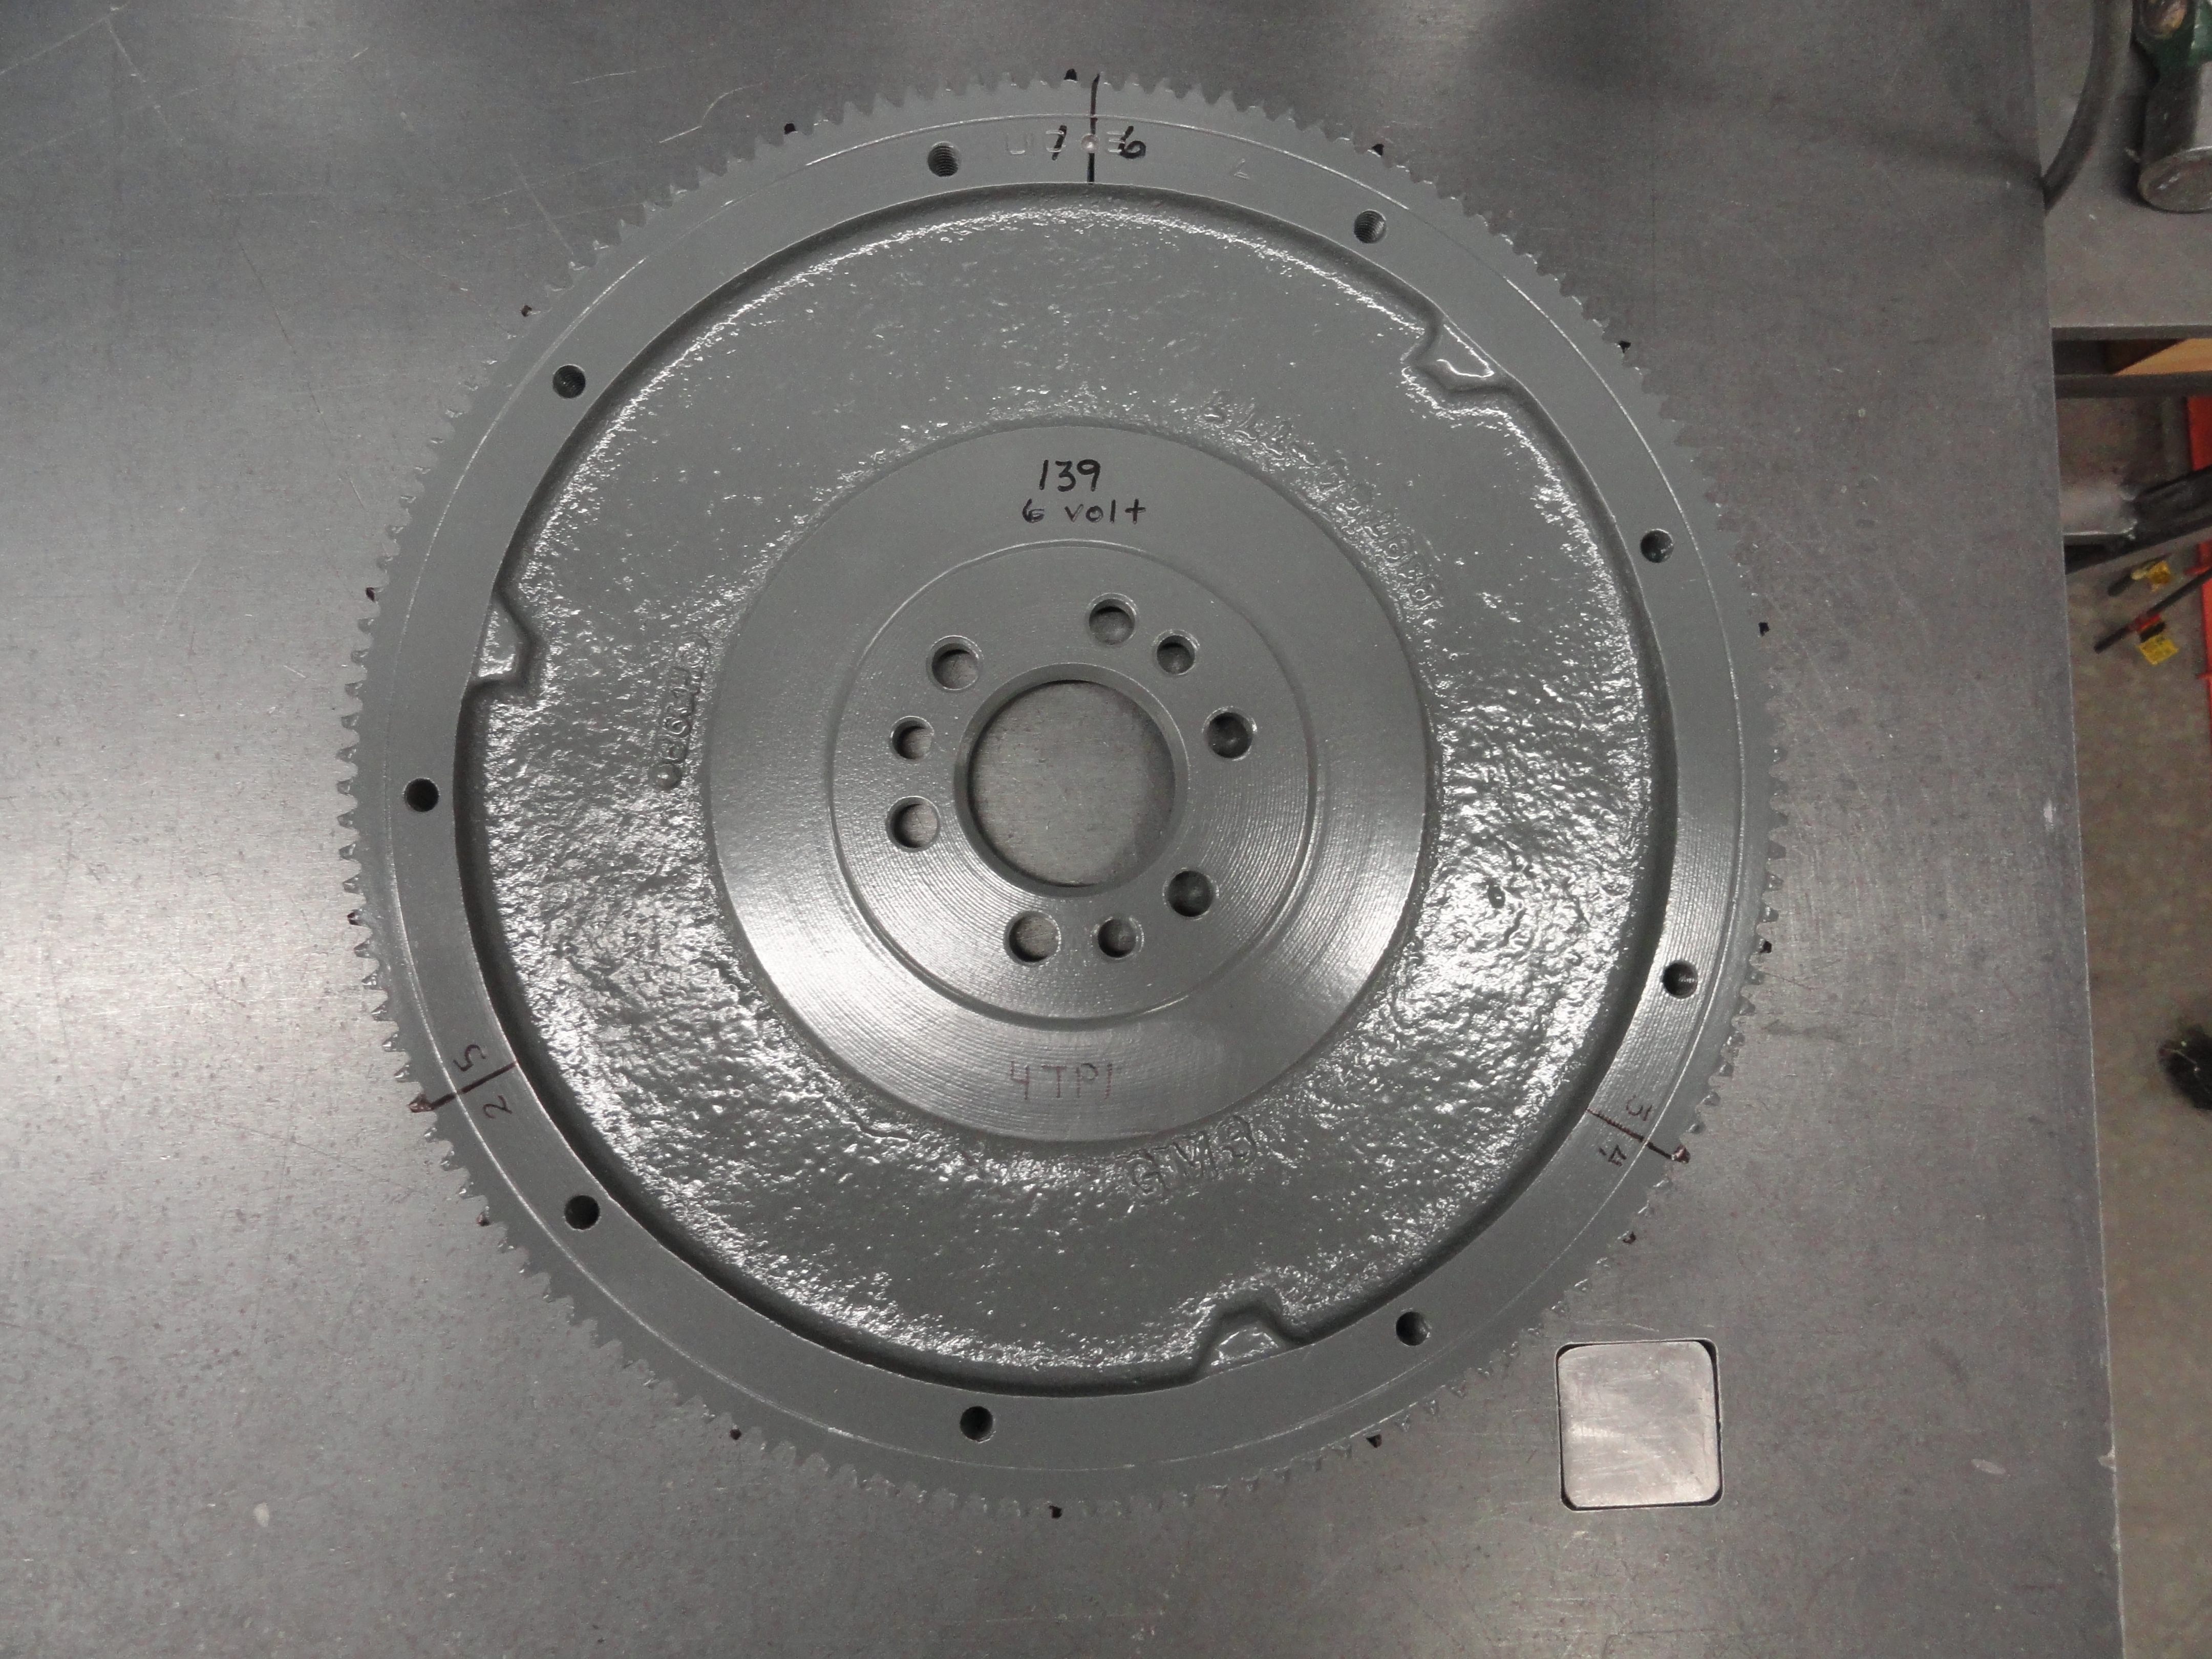
Since the 1942-1953 216 engines have flywheels that are totally compatible with the newer 235, many folks opted to go with the flywheel off of their old 216. The reason why has to do with the trucks system voltage and the Starter. The old flywheels have a 139 tooth ring gear and all Starters until 1955 were 6 volt. They also have a 6 volt starter drive gear that only engages in a 139 tooth (4 teeth per inch) ring gear. This does not mean that if you have a 12 volt system, you for sure have one or the other flywheel. That is because the 6 volt starter works just fine in a 12 volt application. The reverse is not true.
This is because the 12 volt Starter has a starter drive gear that is only compatible with the 168 tooth (5 teeth per inch) ring gear of the newer style 235/261
engine. To make things more confusing, you can get the foot controlled starter in either 6 or 12 volts. Someday, you will need to purchase a new Starter for
your truck. It would be nice to know which one you need. So while it's out of the truck for this project, shine up the BB so it can be seen through the
Bell Housings Timing hole, then mark your flywheel according to the following.
If you have a 139 Tooth Ring Gear on your Flywheel:
It is also a good time to look over the teeth to make sure the starter will engage properly. If you see excessive wear, it may be a good time to remove your ring gear and turn it over, or purchase a new one. Ring gears are pressed on and can be heated with a torch then they almost fall off by themselves, or with a brass hammer or brass punch, slowly work your way around being very delicate so as not to warp or damage the ring gear. To re-install it, you will need to put the ring gear in the oven at 400 degrees until its thoroughly hot, then very quickly put it back on before it cools. Ring Gears are not indexed in any way, so not to worry about how it's placed. You can even swap ring gears to get the proper tooth pattern for your starter.
"The ring gear is removed in two ways, each at their own peril: 1) using a brass hammer (or hammer - brass drift), lightly tap the ring gear off or 2) using an acetylene torch with either a rose tip or large tip on low heat, heat the ring gear and it will fall off. If a gorilla or bull uses the hammer in method 1), it can distort the ring gear, ruining it. Note that a ring gear that’s been on the flywheel for 60-odd years will need finesse and patience in tapping until it "breaks loose". I hate using that term. With method 2), if the devil uses the torch, too much heat will distort the ring gear, ruining it. However, even heating and patience will get the ring gear off very easy."
"To put the ring gear back on, thoroughly clean both ring gear and flywheel with a wire brush. Now is the time to flip the ring gear over
to engage "new" teeth. To put the ring gear back on (obviously no indexing is needed), put the ring gear in an oven at 400 degrees for
about 10 to 15 minutes and it will drop right on the flywheel. Be quick! Before I had my shop oven, I used the one in the house (insert
your favorite spouse joke here) and had the flywheel right outside the back door. I barely had enough time to get out the door and drop
it on before it was too small (cooling = shrinkage). I always "seat" the ring gear on with a brass drift once its cooled. Some people
tap the ring gear on with brass hammer, I would only use that as a very last resort (military field repair to get operational again).
Everyone has an oven and a clean ring gear on top of tinfoil (or a large foil drip pan) does no harm (in my opinion)."
NOTE: Thanks for that Allen!
In addition to the considerations above, it's also a good idea to know what clutch size is correct for your flywheel. On the back of the flywheel is the clutch
plate mating surface. If the surface of your flywheel has a mating surface of 9.5 inches, you can only install the 9 inch clutch. If your flywheel has a mating
surface of 10.5 inches, you can install a 9 or 10 inch clutch. 11 inches for an eleven inch clutch. Clutch discs commensurately come in 9", 10", 10-1/2", and
10-3/4" diameter sizes. Pressure Plates came in 9-1/2", 10", 10-1/2" and 11" inch diameters. When purchasing your new clutch parts, be sure to get the proper
throwout bearing for your clutch assembly. The point being, tell your parts man the size of your flywheel mating surface to get the proper parts. Don't assume
the correct parts were already in there. The previous owner could have installed whatever parts were available without knowing that most of these parts are
interchangeable even if it's not a good idea.
Taking the time to do these things will give you more information about your vehicle and take a lot of the guesswork out of it.
A 139 tooth ring gear has 138 grooves. 138 divided by 3 is exactly 46. This is handy because now we can mark our flywheel so that we know exactly when the pistons are at the top during each cycle. We will observe our markings through the timing hole on the bell housing as shown. We have had many comments from people who thank us for this idea. Especially during initial engine timing and valve adjustments.
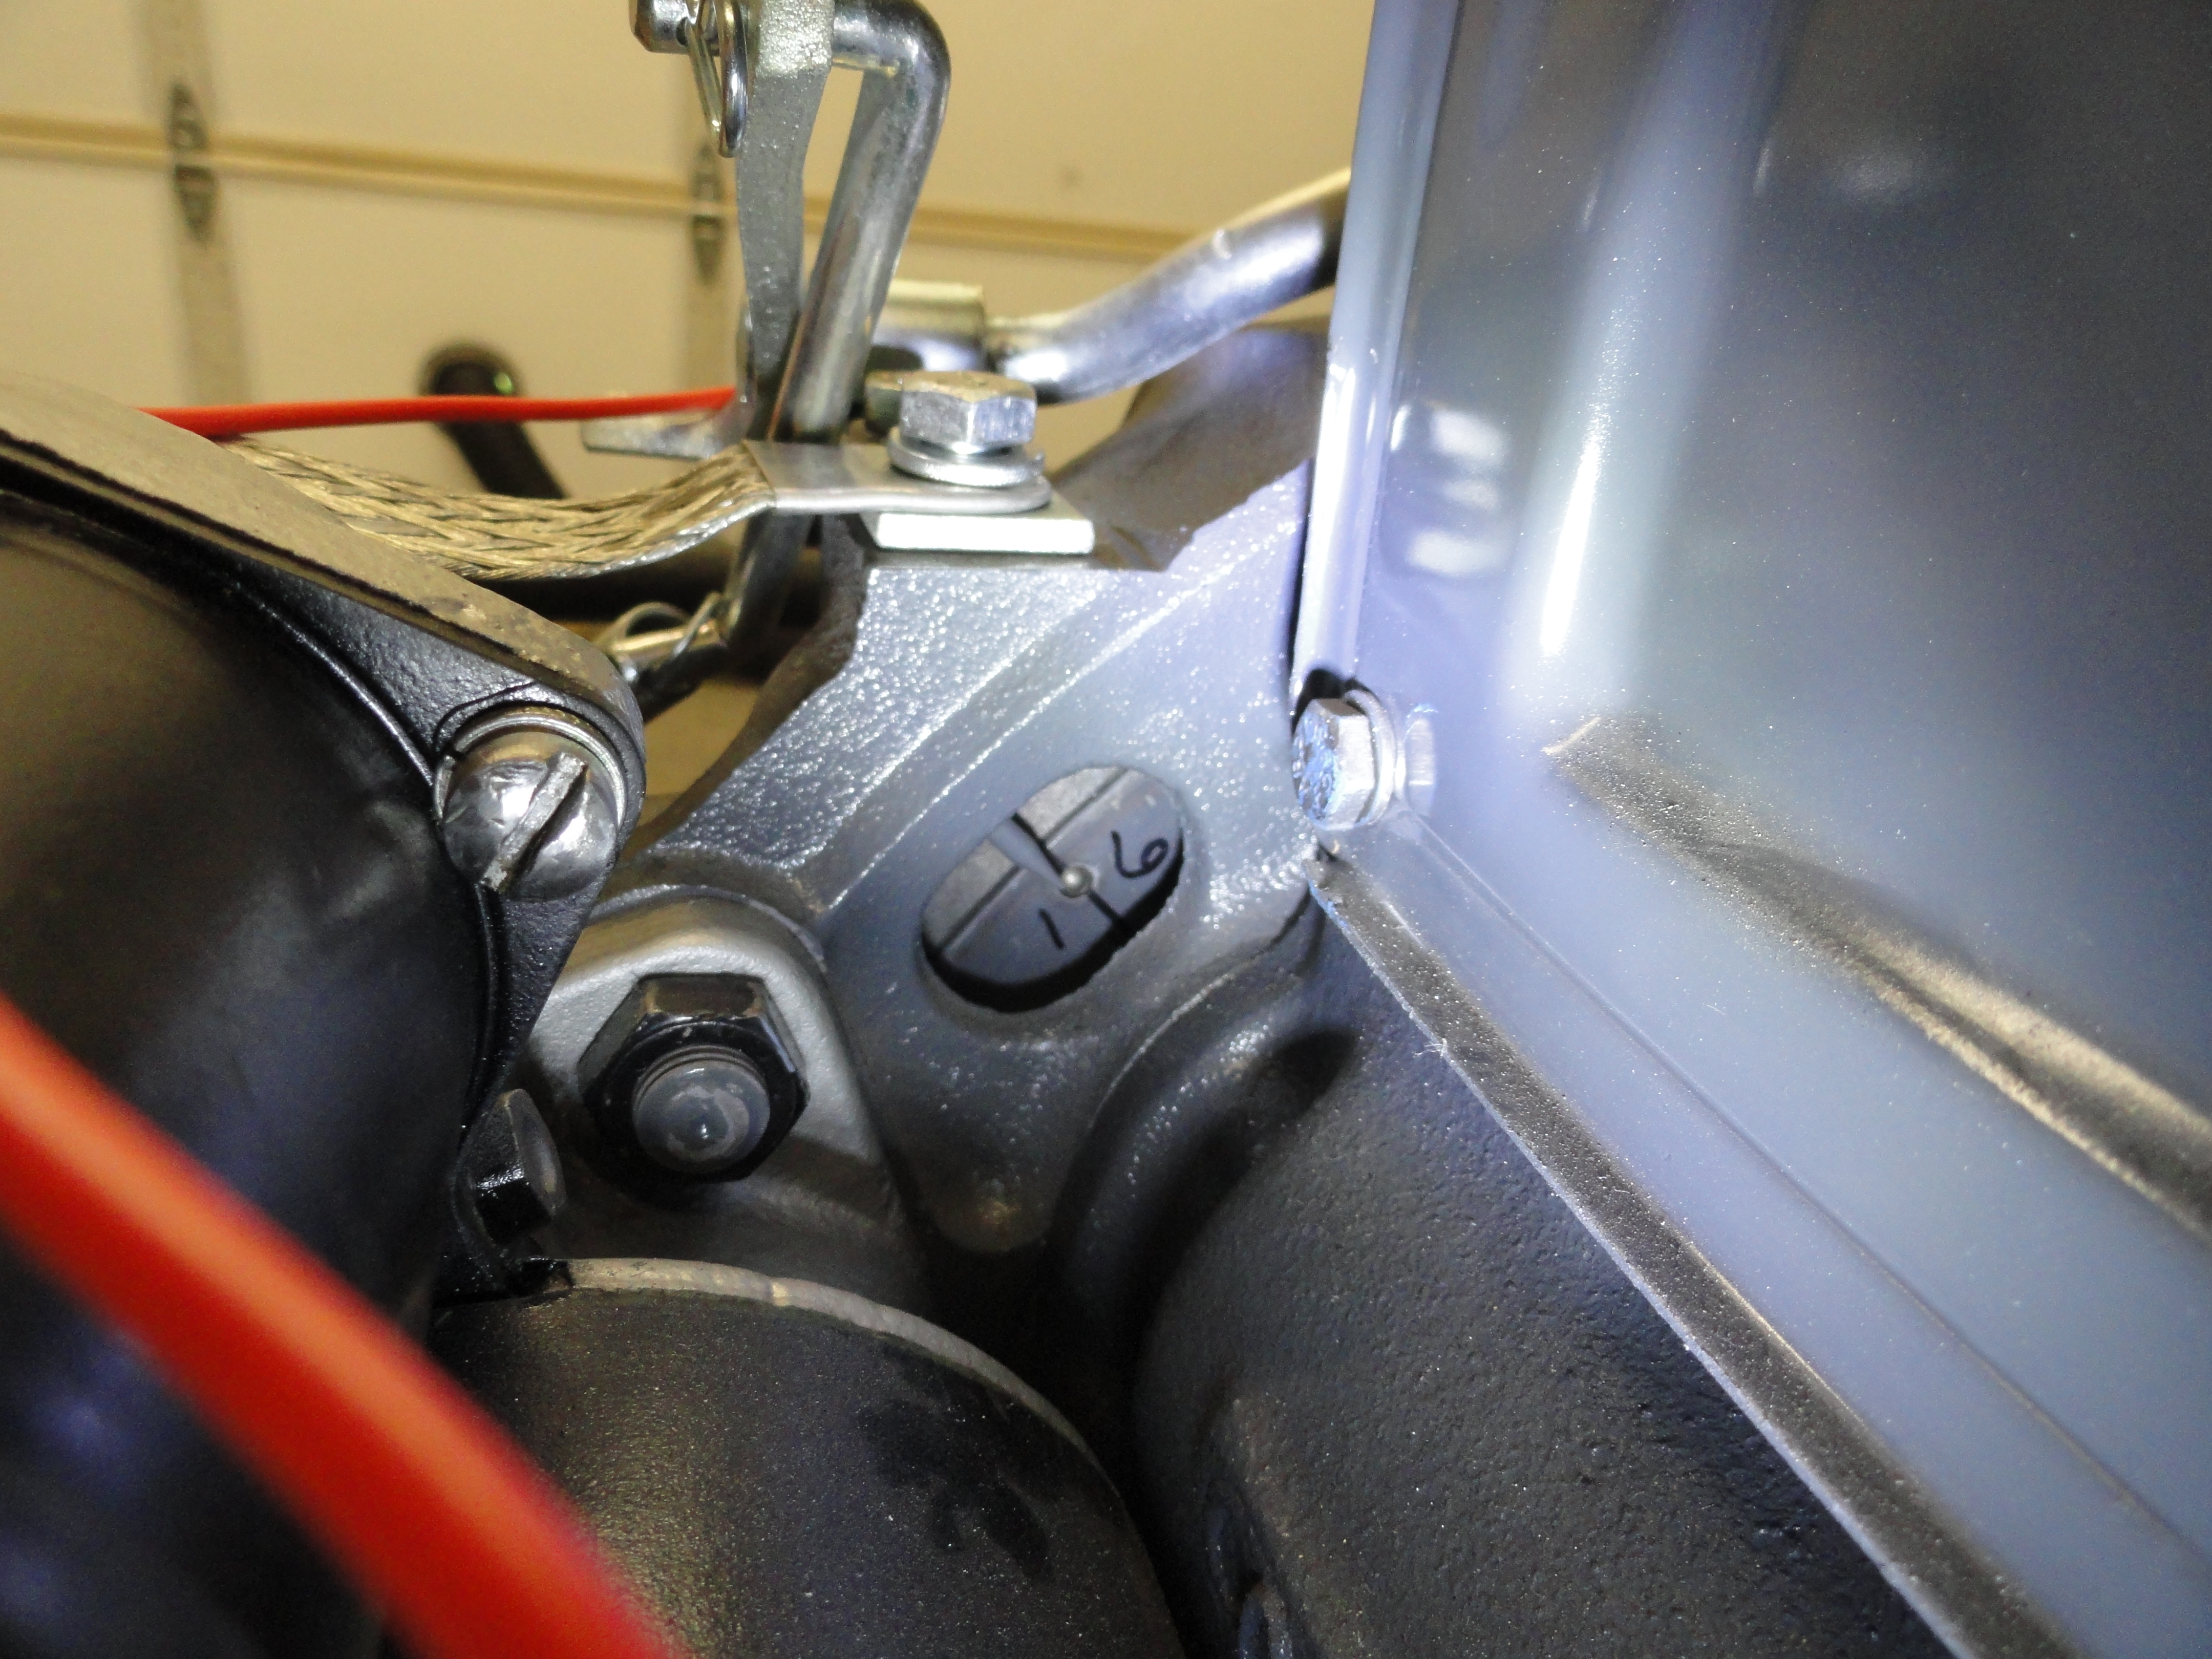
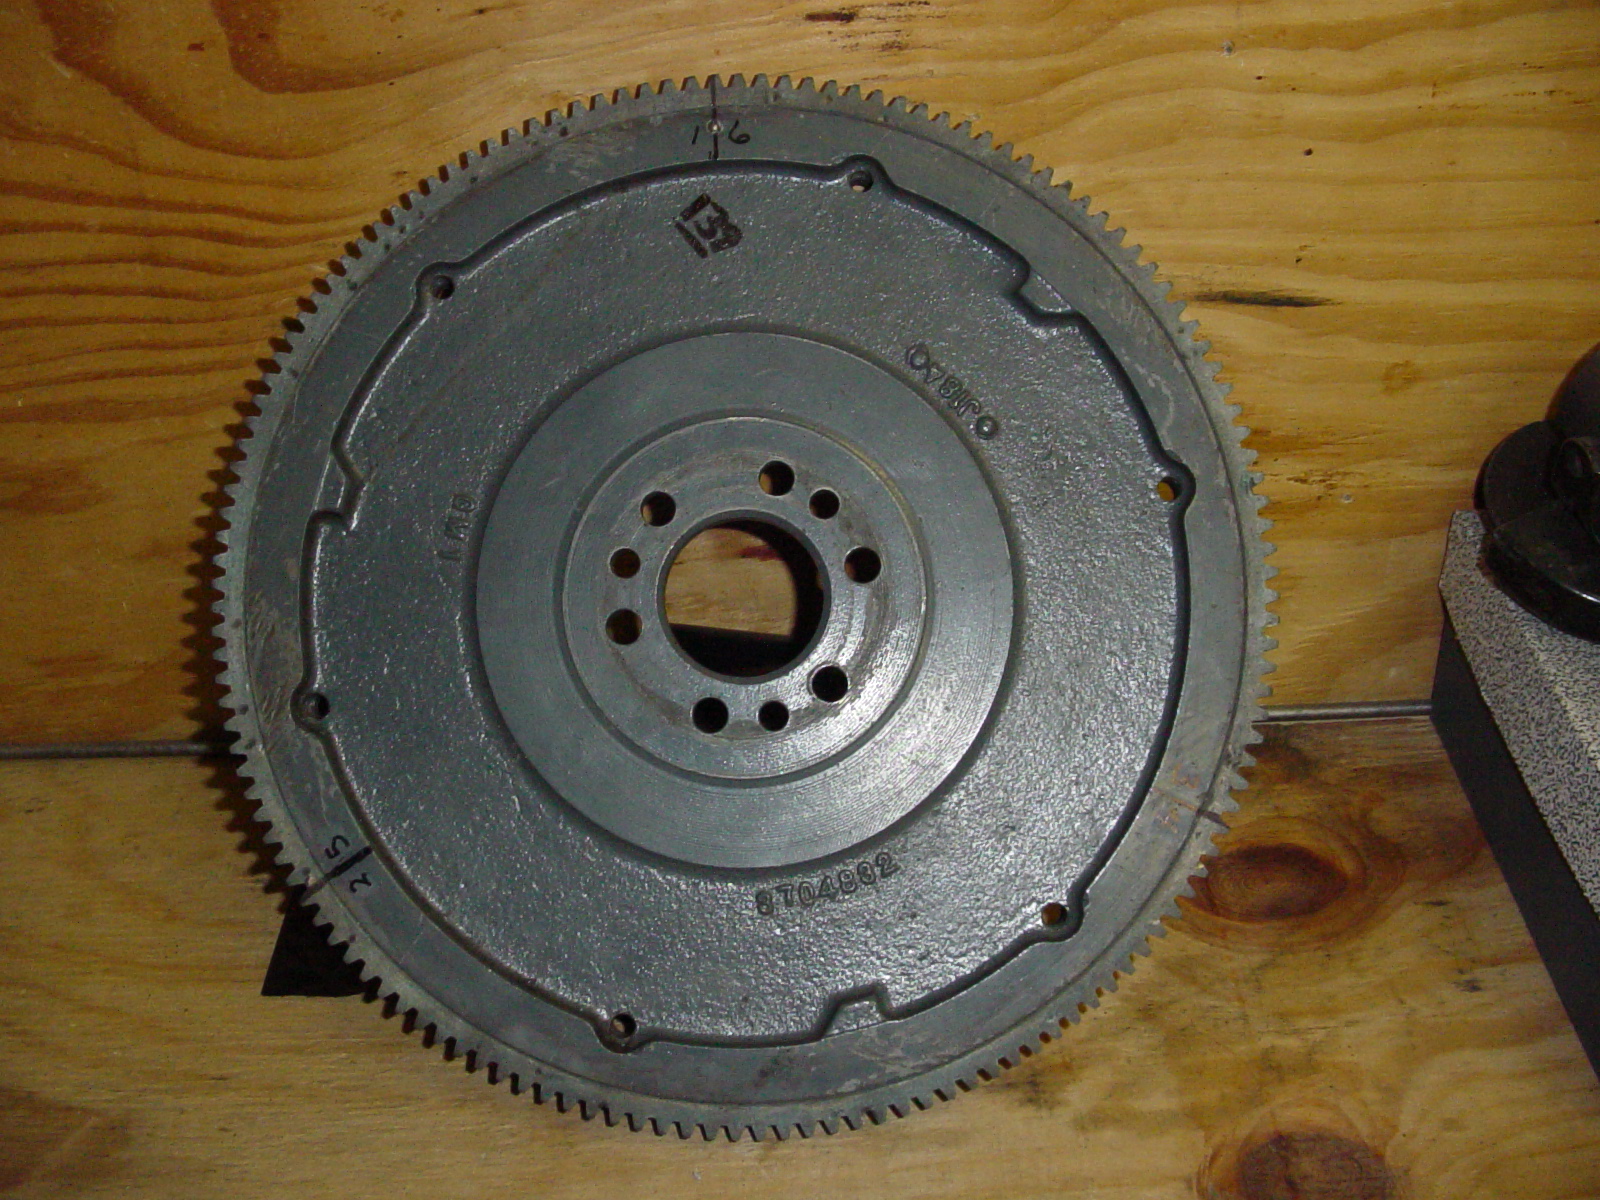
So before installing your flywheel, get out your sharpie and mark it nicely first. You will be very glad you did when it comes time to set up your engine. Start with the BB that's embedded into the flywheel. For those of you who don't think it's there, it is, you just have to clean the flywheel enough to find it. The BB is cylinders 1 and 6. Count 46 grooves to the left and mark it 2 and 5. Count 46 grooves to the right of the BB and mark it for 3 and 4. Now count between 2/5 and 3/4 to make sure you get 46 and you did it right! Now when you turn your flywheel you can get a much better idea of what cylinders you are on. Great for static timing an engine!
Flywheels - Group 0.666. Some have 9 holes for the clutch cover and some have 6 holes (generic after markets will have all the holes). The sizes did come in 9-1/2", 10" and 11". Eleven inch flywheels came stock on Commercial Utilities and are typically considered the heavy duty version. The sizes are all mixed around on vehicles depending on what Chevrolet was trying to accomplish (which I have decided is a mystery). There are no absolutes that I can find. In fact, flywheel casting 3705410 can be a 10" or 11" flywheel. What defines it is the stamping and that seems inconsistent. For example, a lot are stamped 2 "bar" UC. The bar is vertical. Some have a delta and some have some symbol I have yet to figure out.
Clutch discs commensurately come in 9", 10", 10-1/2", and 10-3/4" diameter sizes. Plates (pressure plates) came in 9-1/2", 10", 10-1/2" and 11" inch diameters. Mix and match! One time I serviced a pickup with the 11 inch flywheel and plate with a nine inch disk. That poor clutch didn’t have a chance. I suppose there was an immediate need for the pickup and a limitation of parts.
Check out the original Chevy Master Parts Catalog (1929-1954). We are all very grateful for the efforts of Keith Hardy and the folks doing the Old Car Manual Project.